How to Enable USB Debugging and Developer Mode on Android
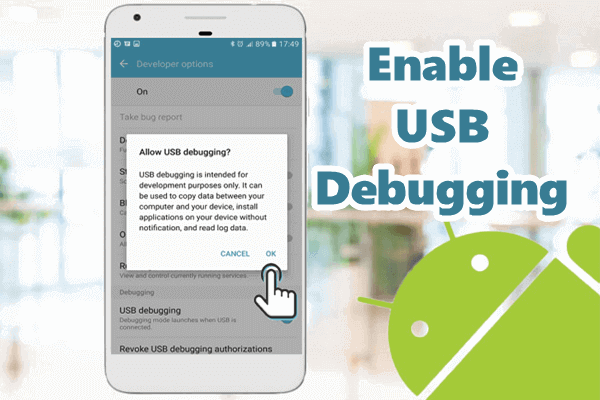
What is USB Debugging? If you ever attempted to tinker with your Android device, you may have heard of “USB Debugging”. Android USB debugging may sound scary, however, it is not as complicated as you think. Instead, it is just an essential option that allows Android phone to transfer data to/from a computer. The coolest thing is that it allows you to root your Android, install custom ROMs, fix bricked Android, give ADB commands and so forth.
Enabling USB debugging indeed helps a lot for developers and enthusiasts who want to enhance the usage of their Android smartphone. Android users need to enable this feature to recover deleted data on Android with Android Data Recovery software, while Android developers require this feature most frequently to test Android applications on Android devices.
If you intend to have much more freedom of control over your device, you will want to read this article which shows you how to enable USB debugging on Android device. There can be done in many ways and many situations when we need to enable USB debugging, so we will discuss such three important situations in three different parts in our post:
Part 1. How to Enable and Disable USB Debugging on Android Device
Whenever you trying connecting your Android device to the computer or laptop, your phone must always asks you to enable the USB debugging first before it can be recognized by the computer. So in this section, we will firstly tell you how to enable or disable the option of USB debugging on your Android device running from Android 2.3 to Android 9.0.
Before we go on, one thing you should know in advance. As with further versions of Android, security is getting tighter and so are the options on your device. Previously there were direct options to enable USB debugging on the old Android versions, and nowadays you have to first enable Developer Options to breakthrough the USB debugging option on Android 4.0 to Android 10. Developer Options is a great way to enhance the functionality of your phone, but improper use of it could affect the way your device functions. Hence, you should know exactly what you are doing before proceeding any settings. And we advise you to avoid configuring any other settings in Developer Options after enabling USB debugging.
Tips on How to Check Version of Android on Your Phone
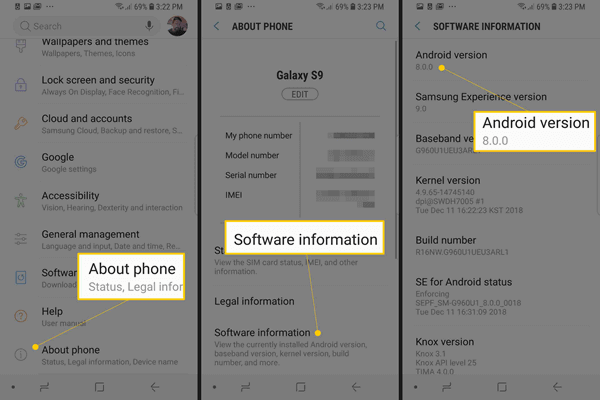
In order to pick out the right way to enable USB debugging on your Android mobile, you should first find out what version of Android you have on your device. To do that, please go to Settings > About Device > Software infomation > Android version, and they will tell you your Android version.
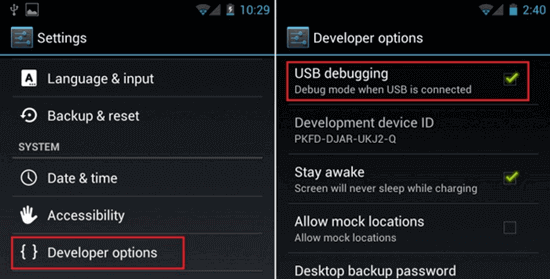
For Android 4.2 Jelly Bean to Android 10:
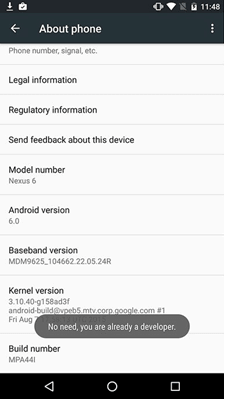
Step 1: On your Android device, head to “Settings”, and then scroll download to the bottom and hit “About phone”. After that, locate the “Build Number”, and then tap on the Build number seven times constantly. When you are done, you will get a short pop-up in the lower area of your display saying that “you are now a developer”.
Step 2: After you enabled the Developer mode on Android, now you have to go back and you will find there is the Developer options menu. Once you enter it, you can find the USB debugging options. Now, just simply turn on the USB debugging option and click “OK” on the prompt.
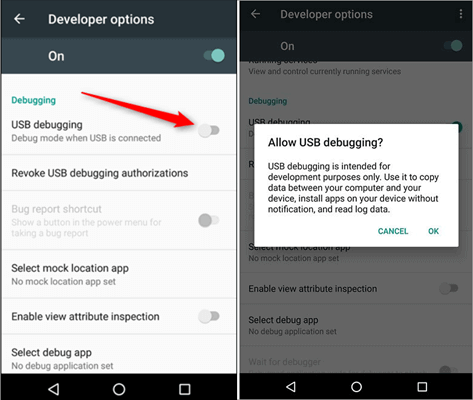
After that, you can enable and disable USB debugging whenever you want by going to Settings -> Developer Options -> Debugging -> USB debugging.
For Android 4.0 Ice Cream Sandwich and 4.1 Jelly Bean:
Step 1. Go to Settings -> Developer options, and enable it.
Step 2. Once you have enabled the Developer options, you just simply scroll all the way down until you see the USB debugging option, and check it.
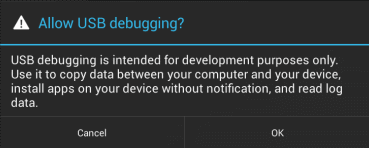
Step 3. After that, a pop-up window will appear and ask you whether to allow USB debugging. You just need to tap “OK” to confirm it.
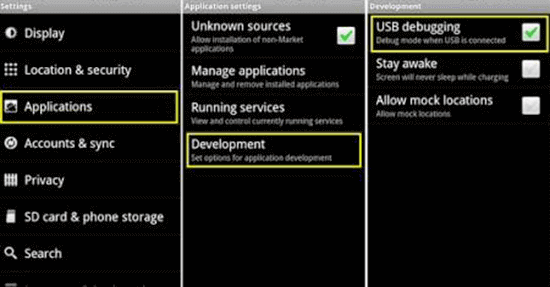
For Android 2.3 Gingerbread and Earlier:
As we mentioned earlier, there is direct way to enable USB debugging on the old Android versions, so you don’t have to enable Developer Options firstly. Instead, you can directly go to Settings and turn on the USB debugging mode.
Here is the simple step to do that: Settings -> Applications -> Development -> USB debugging -> Enable it.
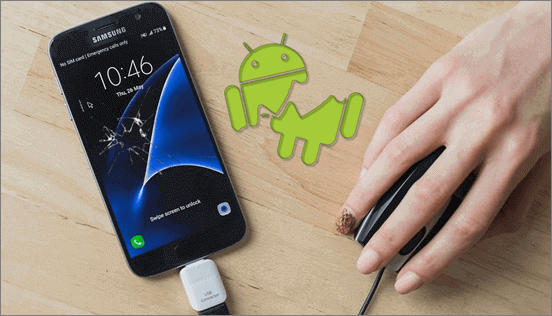
Part 2. How to Enable USB Debugging on Broken Screen Android
We know that many people may face this situation, that is, the touch screen on Android device gets broken, but fortunately the screen might still light up. If you are stuck in this situation and want to enable USB debugging without screen, you can still use a USB OTG and a mouse to control your smartphone easily.
The USB OTG (USB On-The-Go) is a technology which allows you to connect any external device such as a mouse, a USB drive, a keyboard, etc to your Android smartphone or tablet through a USB Type-C or a micro USB port that is given on your device. For example, you can connect a mouse to your smartphone via an OTG cable and use the mouse to control your Android device without even touching the screen.
But this OTG technology is not supported on every Android smartphone. So before proceeding, you should actually check whether your broken screen smartphone is OTG compatible or not. You can just refer to your user manual of the smartphone or just simply Google that if your device supports USB OTG connection or not.
Here are the simple steps to follow so that you can enable USB debugging on your broken screen Android smart device with USB OTG. If you want to know more about how to use USB OTG on broken screen Android, you can refer to this post.
Step 1. Use an OTG adapter to connect your Android smartphone with a mouse.
Step 2. Connect your broken screen Android to your PC or laptop, and the smartphone will be recognized after the drivers get installed.
Step 3. Now, just left click on the mouse to unlock your smartphone and then head over to Settings and turn on USB debugging. Please refer to PART 1 if you have any problems.
With these easy steps you can directly enable the USB debugging settings and increase the functionality of your device even if your touch screen might not be working on your Android smartphone.
Part 3. How to Enable USB Debugging on Android from PC Remotely
Have you ever thought if it is possible to enable USB debugging on your Android device remotely from your computer or laptop? The straight answer to the question is a simple no. Though there is no immediate way to enable the USB debugging option directly from your PC/Mac, you can still use the ADB commands or via terminal to enable USB debugging on Android through your PC or laptop.
On Android OS, there’s a tool named SDK that can be used to debug any problems happen on your Android device. Android Debug Bridge (ADB) tool is one of the parts of the SDK tool. By using this ADB tool on your computer, you can connect as well as communicate with your Android device via a USB cable and execute a series of commands for various functionalities.
Here are the steps to enable USB Debugging on Android from PC using the ADB command:
Step 1: Firstly, you have to install the ADB tool on your PC or laptop. You can download minimal ADB and Fastboot tool here.
Step 2: Normally the ADB needs to communicate with your Android device via USB debugging. As the USB debugging option is turned off, you will have to boot your device into the ClockworkMod Recovery mode by holding the Power button + Home + Volume Up or Down which depends on the model.
Step 3: When your smartphone enters the recovery mode, launch the ADB tool and then connect your Android device to PC or laptop via a USB cable.
Step 4: Now go to the command prompt and type: adb_enabled. Now the USB debugging option gets enabled by default and now you can use your Android device without any problem.
Summary
So, here are several simple procedures for Android users to enable USB debugging, even on a broken screen Android. Some steps might seem a bit complex, but if you follow the above-mentioned instructions carefully then you can easily get things done without facing any hiccups whatsoever.