How to install iOS or iPadOS 13 beta using Xcode 11
Recently, Apple has introduced the beta version of iOS 13 for iPhone users and iPadOS 13 for iPad users. This newly developed software is rich in new features of iOS with advanced technology. So, if you don’t want to miss this newly developed technology and avail the latest features then install the iOS 13 or iPadOS 13 for your device. For that, this article offers all the information about the installation of the beta version of iOS and iPadOS 13 software. Read the article carefully and get all the ideas about iOS and iPadOS 13 software.
Prerequisites of Installation of iOS 13 and iPadOS Beta Software
Before going for any betas on your device, you need to back up as there is a high chance of data loss and some reliability issues during installation. For this reason, the back up of the data present on the device is recommended. Make sure that you are not using the tool on which you can’t downgrade the iOS or iPad 13 beta software.
iOS 13 and iPadOS 13 has many new features capable of adding exciting things to iOS devices. The software developers can try out its new features to create unique specifications for iPhone and iPad.
To get access to the iOS 13 and iPadOS 13, you will require to first sign in to the Apple’s portal with the same Apple ID logged in to the device. Moreover, one needs to have a paid $99 per year membership, which lets the Apple users access the section of downloads. After this, make sure that your device is capable enough for the installation of iOS 13 and iPadOS 13.
iOS 13 and iPadOS 13 System Compatibility
iOS 13 is compatible with iPhone XS, iPhone XS Max, iPhone XR, iPhone X, iPhone 8, iPhone 8 Plus, iPhone 7, iPhone 7 Plus, iPhone 6s, iPhone 6s Plus, iPhone SE and iPod touch (7th generation).
iPadOS 13 is compatible with these given tablets: 12.9-inch iPad Pro, 11-inch iPad Pro, 10.5-inch iPad Pro, 9.7-inch iPad Pro, iPad (6th generation), iPad (5th generation), iPad mini ( 5th generation), iPad mini 4, iPad Air (3rd generation) and iPad Air 2.
Installation of iOS 13 and iPadOS 13 beta
There are two ways offered by Apple for the installation of iOS 13 and iPadOS 13. After fulfilling the minimum requirement to access Apple’s portal and beta download section, you can proceed to download the iOS beta to avail the latest features. There is no on-air configuration sent for the upgrade to iOS 13 and iPadOS 13. The user needs to download the file from Safari and installation of the beta version of iOS 13. Hence, you need to go for the manual download process to download the iOS 13 beta or iPadOS IPSW files and install them with the help of iTunes.
Two ways using which one can install the iOS and iPadOS 13 on the Apple device are given below.
- Using the developer beta of macOS Catalina 10.15
- Using the Xcode 11 beta
Let us learn about the installation of iOS 13 or iPadOS 13 using Xcode 11 beta in detail.
How to install iOS or iPadOS 13 beta using Xcode 11
If your current version is Mac OS Mojave or the earlier commercial version of macOS, then you can go for this method. It is a perfect method for people using the mentioned version of macOS as it does not ask to update the computer macOS Catalina 10.15 beta for the installation of the latest software.
Installation of iOS 13 or iPadOS 13 beta is accessible by downloading and installing the multi-gigabyte Xcode 11 beta. Xcode 11 beta lets the user get the latest Apple updates via iTunes which is comparatively very easy than that of macOS Catalina 10.15.
How to download and install Xcode 11 beta
Follow these simple steps to install the Xcode 11 beta on your device. You must have this system downloaded and installed on your system for getting iOS 13 or iPadOS 13 through iTunes.
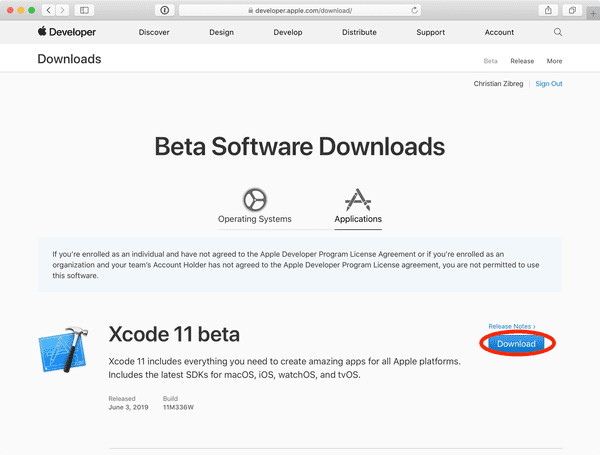
- Go to the http://developer.apple.com/download, i.e., Apple Developer website with your Mac and sign in to the same Apple ID account as there in your iOS or iPadOS device.
- On the top of the screen of the Mac, you will get Applications option. Click on it and then locate the Download under the Xcode 11 beta section. Select the Download.
- The size of Xcode 11 beta is 7.66 GB so you must have that much of space available on your device for quick downloading without any hassle. Once it is downloaded, you can click on the file to install it.
In this way, you have Xcode 11 beta on your device which you can easily use to get the iOS 13 or iPadOS 13.
Installation of iOS 13 and iPadOS 13 beta Software with the help of Xcode 11 beta
From the above steps, you have learned about the way to download and install Xcode 11 beta on Mac. Now, locate the downloaded file in the downloads of Mac to use it for further processes. For doing that, you can go to your Mac’s Downloads by clicking on the Desktop and then select the Option> Command> L Combination from the keyboard. You can also locate the Xcode file going to the Finder’s Go menu. From there, select Downloads and then navigate to the “Xcode_11_beta.xip”. Double-click on the “Xcode_11_beta.xip” and then install the software. You will be prompted some simple instructions for the installation of Xcode 11 beta which you need to follow to launch the Xcode on your device. You will also be asked for your Mac OS user password to confirm the installation process is done authentically. After the installation of Xcode 11 beta software, follow these steps to use it for the installation of iOS 13 and iPadOS 13 on your iOS or iPadOS device.
1. After the successful installation of the Xcode app, launch it from the Applications folder on your Mac OS.
There is the requirement of some additional elements for the installation of iOS 13 and iPadOS 13 with the help of Xcode 11 beta software. For this reason, you will receive some prompted information by the Xcode which you need to fulfill positively. It will take some time for the laughing if the app after installation of some components and associated operation. You need to follow all the commands given by Xcode until it is successfully launched on the device.
2. After launching the Xcode 11 beta software, you need to get the iOS 13 and iPadOS 13 beta installers. For this, visit the Apple Developer portal window on Safari and click on Operating System present at the top of the screen. Under the iOS 13 or iPadOS 13 beta section, click on Show All and then select the Restore image after locating your iOS device model.
In this way, you will get the restore image downloaded in Mac’s Downloads folder. You can quickly check the status of downloading using the View menu of Safari and then clicking on Show Downloads. Else you can press the command and L combination option on the keyboard by selecting the Safari window on the Mac.
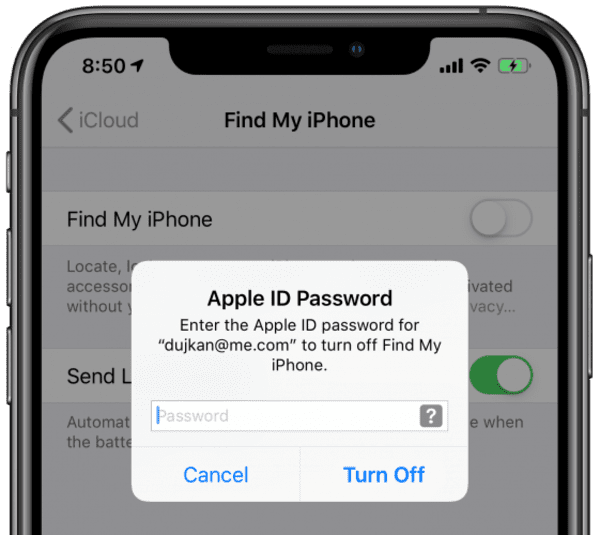
3. It is essential to turn off the Find My iPhone/ iPad while installing any new iOS software. It is a necessary condition for obtaining new software for the Apple device. To do so, go to the Settings on your iOS or iPadOS device and then select the user’s Apple ID bio present at the top of the screen. From there, tap on iCloud> Find My iPhone/ iPad and then turn it off by toggling off the button. To complete the deactivation of Find My iPhone/ iPad, you need to confirm by entering your Apple ID password. Then, tap on Turn Off. In this way, you will get the Find My iPhone/ iPad turned off for your device.
4. Launch iTunes on your device, or you can open it from the Applications folder.
5. Now, you can connect your iPhone or iPad to your Mac using a cable and then click on its device icon to get the further options. While doing so, you may be asked to enter the passcode of your Apple device (iOS or iPadOS) to confirm the connection.
6. The backup of all the current data is important to about data loss and to downgrade the upgraded version whenever desired. Proceed to create am archived backup by clicking on This Computer. Then, check the Encrypt local backup option and then select your encryption password. After this, click on Back Up Now present under the iTunes Backup section. You can also confirm the back up of apps if asked.
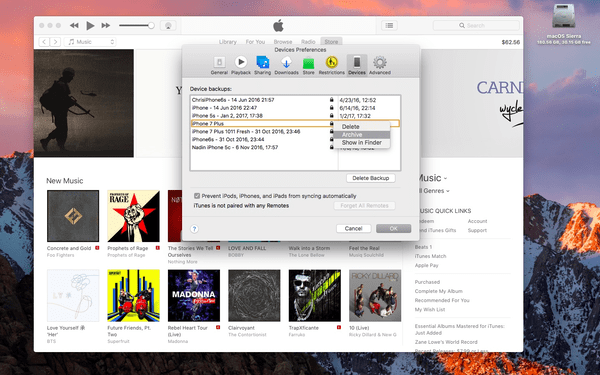
7. After creating a backup of your iOS or iPadOS device, you need to archive the backup files. To do so, select the Preferences under the iTunes many and then click on Devices. Then, right click or control click on Backup and then choose Archive. To confirm the operation of archiving the backup, click on the Ok button. In this way, you can save your data from overwriting and keep all the data secured. This will help you to protect from data loss in the case you will look for downgrading the iOS version.
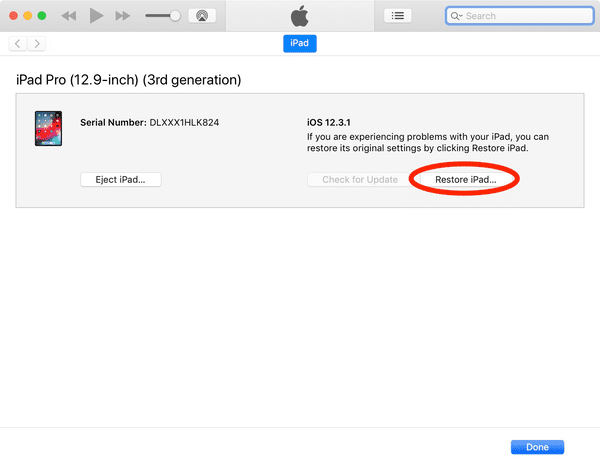
8. Now, press and hold the Option key on your keyboard and then select the Restore iPhone/ iPad in iTunes.
9. A Finder window will open on your computer screen in which you need to click on Downloads, or you can navigate the downloaded restore image. Then select that IPSW restores image file and click on the Ok button.
In this way, you will get iOS 13 or iPadOS 13 installed on your device. Now, you can check your Apple email for the information of this installation on your device. Your device will get restarted automatically to boot up the system for fresh. Don’t get panic on sudden restart. Moreover, don’t turn off your computer or disconnect your device from your computer until the installation of iOS 13 or iPadOS 13 is complete.
Read: iCloud activation lock removal
You have read about the most prominent method to install iOS 13 or iPadOS 13 beta software for your Apple device. As it is recently launched for Apple users, so you can start using its beta version and enjoy the latest technology and advanced features. It will completely change the way of operating an Apple phone or tablet innovatively. For any queries or doubts, write to us through the comments section.
Tips: How to back up your iPhone or iPad 2019
How do you make sure you don’t lose your photos, messages, and other data? Back up your iPhone and iPad now using Jihosoft Free iPhone Data Recovery!

