How to Use Photoshop’s Background Eraser Tool Effectively
The Background Eraser tool is a feature on Photoshop that enables users to remove certain elements from an image besides the subject. So if you have an image of a city skyline and you want to remove the sky from the picture, the Background Eraser tool is going to be useful.
As great the Background Eraser tool is, it does take a lot of patience for you to learn it. One small mistake and you could delete the wrong part of the picture. This is why if you are trying to learn Photoshop, you need to know more about this particular tool.

If you just simply need a smart Photo Eraser Tool to erase some unwanted objects from the pictures, for example tourists, watermarks, or even skin blemishes, you can learn from here.


How to Find the Background Eraser Tool
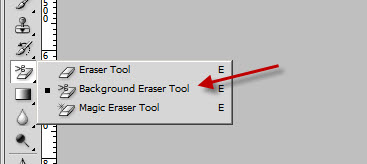
If you are new to Photoshop, there is a big chance that you will get confused with the many tools on the software. If you are looking for the Background Eraser tool, it is likely that it is just hiding behind the Eraser tool. Right-click (control-click for Mac users) the Eraser tool and you will be able to see the Background Eraser in the fly-out options. Select the tool to start using it.
How the Background Eraser Tool Works
Now that you have selected the Background Eraser tool, you will see that the mouse cursor will transform into a circle with a cross-hair inside. This is because the Background Eraser function is really a fusion between the Eraser tool and the Brush tool.

Since the Background Eraser acts like the Brush tool, you will be able to easily change its size with your keyboard. You just need to press the left bracket ([) if you want to reduce the size and the right one (]) to enlarge it.
So how does the Background Eraser tool work? Basically, the tool samples the color that is under the center of the circular tool. The tool will then delete the parts of the picture within the larger circle that matches the color that is trapped within the circle. This happens without erasing the focal elements of the image.
For example, the removal of the background portion of an image of a city skyline will be easier than ever through the Background Eraser tool. In this picture, the buildings of the city skyline will be colored black and the sky will have a blue hue. If you point the enlarged Background Eraser tool on a portion of the picture with the circle’s center touching the sky part, it will delete all other blue portions within the big circle.
If you happen to make the mistake of deleting the wrong part of the image, do not worry. You just have to press Ctrl + Z (Command + Z on the Mac) to undo. If there are multiple steps that you have to undo, just press Ctrl + Alt + Z (Command + Option + Z) until you reach the desired previous state of the image.
Tool Options
There are three major options that you can access for the Background Access tool. These are Sampling, Limits and Tolerance. These tools help users control how the Photoshop tool behaves. In this section, we run down the functions for the Background Tool function.

1. Sampling
There are at least three behaviors for the Sampling option. From left to right in the Options Bar, these are Continuous, Once and Background Swatch.
The Continuous one is useful when you are trying to remove a part of the picture with multiple colors. This samples all the colors that you will click. Once, on the other hand, only samples the background once. Meanwhile, Background Swatch lets you choose a specific color from a Color Picker. It will delete the color that is closest to the color you chose.
2. Limits
Limits influence the Background Eraser tool on where it will have to look for the pixels to delete based on the color that you will pick. There are three behaviors that can be chosen: Contiguous, Discontiguous and Find Edges.
Contiguous is the default setting for Limits. It is what is used when you are trying to delete pixels that are physically connected to the pixels under the cross-hair of the tool.
Discontiguous, on the other hand, erases any pixel in the image that matches the sampled color in the cross-hair. Find Edges, meanwhile, is a more accurate version of Contiguous that can remove the background near the edges of figures in the photo.
3. Tolerance
Tolerance is where you set how a pixel’s color should be different from the sampled color for it to be deleted. If the color of your background is too close with the subjecct, you may want to go below 50 percent.
The Background Eraser tool may not be the easiest tool to study in Photoshop’s vast arsenal. But it should be something that every aspiring graphic designer should be able to utilize well. The many advantages of having the ability to use the Background Eraser tool just outweighs the difficulty that is involved in mastering it.
Any other thoughts on the Background Eraser tool of Adobe Photoshop? Inform us about it in the comments below.