How to Permanently Disable Wsappx to Fix 100% Disk Usage in Windows 10
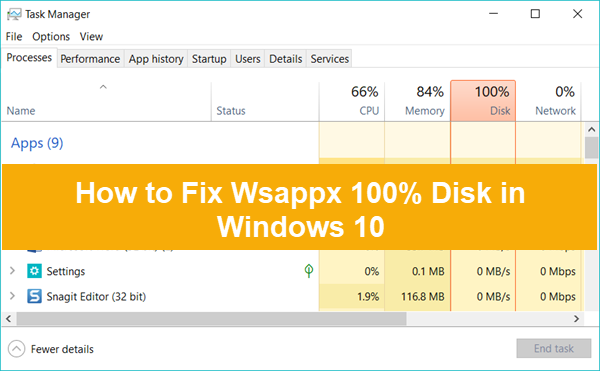
No matter on which version or build of Windows 10, users are constantly facing the issue and pretty annoyed at 100% CPU usage or high disk usage. Especially for the users who don’t have high RAM in their PCs. So, here in this article we are going to introduce the main background process named as “Wsappx” which is responsible for this issue. You’ll know what is Wsappx process and how to permanently disable Wsappx in order to fix 100% disk usage in Windows 10.
What is Wsappx Process
Wsappx process is nothing but a part of task manager which runs in the background as the part of Microsoft’s new update for Windows 10/8/8.1. This process always run in the background of Windows whose duty is to update or install or uninstall the applications and user commands.
Wsappx could occupy the whole disk space of Windows when it is handling the works, and hence lowering down the overall performance of Windows 10 computer. This process is important if you don’t want to miss any new updates for Windows 10, otherwise not only useless but also annoying if it causes high disk or CPU usage. So, users want to get the mid-way through which they can improve the overall performance of their PC without compromising with the updates functioning and installing.
How to Check if Wsappx is Occupying 100% Disk on Windows 10
If you want to go through the detail of this Wsappx program, then we want to tell you that Wsappx is further divided in two sub programs which are AppX deployment service (AppXSVC) and Client License Service (ClipSVC). These two programs have been allotted with two different tasks. But the main culprit is still the Wsappx process which is responsible for eating up all the disk space of your PC.
There may be a possibility that Wsappx is not working in your PC all the time, hence not visible as a running process. So, in order to dig out the real cause, we have to check it manually. Please follow the instruction below:
- Right click on Taskbar on the bottom of Windows 10, then choose Task Manager to open it.
- On Processes tab, locate the process that is taking maximum disk usage (namely Wsappx in this case).
- Right click on the process, then choose “Go to details”.
- On Details tab, right click on the same entry again and hit “Go to service(s)”.
- Check if the process is under Wsappx group.
If it is really Wsappx process responsible for 100% disk usage on your Windows 10, then you may consider disabling it. However, there are also several solutions for fixing 100% disk usage in Windows 10 caused due to other factors.
The cause behind High Disk Usage of Wsappx
As we mentioned that Wsappx process is always running in the background of the Windows OS which can be seen in the Windows Task manager. There are several occasions when there are new updates of various apps like Paint, WordPad, Windows media player etc., which has been rolled out by Microsoft becomes available for download. So, in order to download and install those updates automatically, Wsappx process starts working. You can also see this process when the data usage of your phone eventually goes up without running any website or application. This is the process when updates are been downloaded from the Microsoft Store without having the permission grant from you. Surely, some users are exactly in favor of this process, because there is no need to visit Microsoft store to look out for the new updates. Updates will be automatically getting installed on your PC.
Is Wsappx a Virus?
Some people are probably having this query. As we mentioned, Wsappx is only annoying for the users who are having limited RAM in their PC. Otherwise, there is no such issue. But there are some myths which has been circulated by some users. Please don’t get attracted toward any type of myth and make clear in your mind that Wsappx process is a part of Microsoft developers’ strategy. Wsappx cannot be considered as virus though it eats a lot of disk space, but that is not an issue for majority of the users.
Warning: It is true that virus could slow down users’ computer, which should draw our attention. Besides, virus could also cause data loss, in which case you’re suggested recover files deleted by virus as soon as possible with Jihosoft File Recovery software.


There is no second way to fix Wsappx 100% disk usage other than disabling it permanently. That’s why it becomes important to understand that whether you are really getting annoyed with this process or not. We don’t recommend to disable this process for the users who are having 8GB or higher RAM or premium processor in their PC. This process is quite important for installing the updates and other tasks. Whenever you install or uninstall any type of Application from the Microsoft store, then this process comes in to action.
How to Permanently Disable Wsappx on Windows 10
There are several possible ways of disabling Wsappx process. Though we will list 2 handpicked methods to get rid of Wsappx process. Both of them are really easy to understand.
Method 1. Disable Microsoft Store on Windows 10
Disabling Microsoft store on Windows 10 may result in the bugs and lags issues of the installed application on your PC. But this method is a full proven method for disabling Wsappx process.
- Click Start menu, type “regedit”, then click Registry Editor from the result.
- Navigate to ‘HKEY_LOCAL_MACHINE\SOFTWARE\Policies\Microsoft’ in Registry Editor.
- In the left side of the window, you will find a folder named as “Windows Store”. Just click on it to open that folder.
- After the folder gets opened, just Right-click on the screen and click on the “New” option, then choose “DWORD (32-bit) Value”.
- Rename the newly created file as “RemoveWindowsStore” and hit enter.
- Right click on the file and choose Modify…, then set the value as “1”.
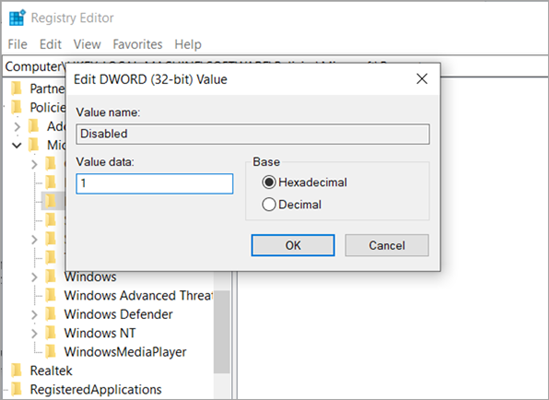
- Click Ok to apply the change, then check if Wsappx 100% disk usage problem still exists after rebooting.
Method 2. Disabling Clipsvc and AppXSvc permanently
- Open Registry Editor as described on Method 1.
- Navigate to ‘HKEY_LOCAL_MACHINE\SYSTEM\ControlSet001\Services\AppXSvc’.
- On the right panel, right click on “Start” and choose Modify…, then change the value from 3 to 4.
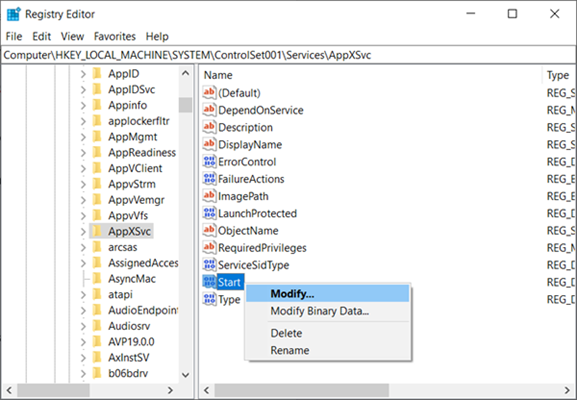
- Now, restart your system to see the changes.
The same process should be applied to Clipsvc, the location of which is:
HKEY_LOCAL_MACHINE\SYSTEM\ControlSet001\Services\Clipsvc
Conclusion
As far as the responsibility of Wsappx process is concerned, it is a much-needed process in Windows 10, but if it is annoying, then you can follow these suggestions we mentioned above. Moreover, you will still possibly see Windows 10 running slow. In that case, you need to troubleshoot for other causes, such as Windows 10 100% disk usage by Superfetch.
If in case you are encountered with any type of issue with the above-mentioned process, then please feel free to ask us in the comments section. We will be happy resolve your query at first.