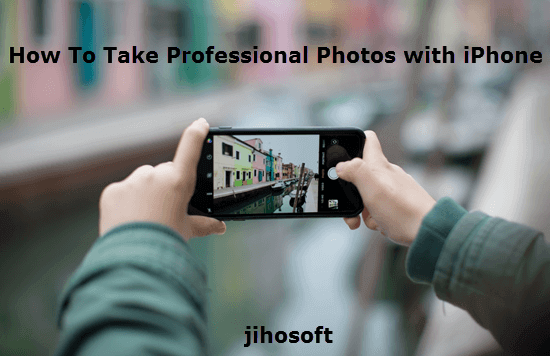
9 Photography Tips to Take Professional Photos with iPhone
People like to take photos with iPhone because of its portability and ever-upgraded camera features. But you may find that the pictures you take are not as good as those taken by others. It’s probably because you don’t know how to use some good photo taking skills yet. This article will show you how to take good photos with iPhone using 9 easy photography tips.
1.Shoot from Different Angles
Shooting from different angles will allow your pictures taken with the iPhone to be significantly more professional. Taking selfies or pictures of the beach at the same angle over and over again will only make your pictures look like every other iPhone photo.

Consider using abstract photography angles, lower or higher angles, and aesthetically pleasing angles. Abstract angles might cause your photo to appear in a way that they’re left to interpretation. Something that is always good to achieve for a photo.
Lower or higher angles will demonstrate a look that isn’t normally seen by the human eye, which is definitely a way to make your photos stand out from the rest of the crowd.
Aesthetically pleasing angles have to do with parallelism, color, and other aesthetics that are appealing to the human eye. Be on the lookout for these kinds of angles. They are meaningful to people who are wondering how to take professional pictures with iPhone.
2. Keep Your Pictures Simple
Keeping your pictures simple is part of the key to taking professional pictures with your iPhone. You might think that taking professional photos means they have to be complicated and filled with subjects, but the reality is that the more simple a photo is, the better it tends to be.
If you look to overly complicating your iPhone photos for the sole reason to complicate them and have an abstract photo, then you’re not creating the photos to the best of your ability.
Don’t worry too much about filling your photo with a ton of nonsense that isn’t worth adding. Determine what your shooting, execute it the best way possible, and you’ll have a finished iPhone photo.
3. Look for Contrast
No matter the level of photography you’re at, it’s very important to look for contrast. Looking for a striking contrast in your photos will propel your photography to the next level.
For iPhone photography, look for areas of conflicting colors and utilize them to your advantage. Photos filled with rich contrast will demonstrate great appeal to people who will view your photo.
If you’re still confused about how to find contrast in your photos, think about the range of color in your photo. Determine the colors that stick out the most and how they fulfill the photo. Not only is this point one of the iPhone photography tips, but it’s a general photography tip as well.

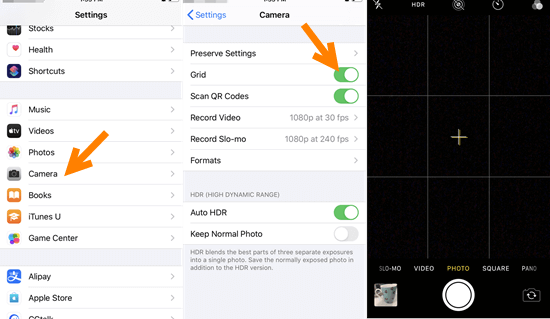
4. Turn on Camera Grid
Other than what to specifically look for in your photos, it’s always a good idea to utilize the camera grid on your iPhone. Turning on your camera grid will help you make sure your shot is straight, even, and how you want it to look.
To turn on the camera grid, go to Settings on your iPhone, down to the Camera icon, and turn the Grid on. Then, once you go back into your camera, you will notice a grid over your camera.
This grid won’t pop up in the actual photo, it’s just one of the iPhone camera’s features to help you take great pictures.
5. Follow the Rule of Thirds
Whenever someone gets into photography, at some point they’re going to hear about the rule of thirds. It is a general guideline for having the main subject of your photo roughly a third of the way into your picture.
Generally speaking, having your subject directly in the middle of your shot is unpleasant and demonstrates a major difference between professional and amateur photographers.
To follow the rule of thirds with your iPhone, take a look at the main subject of your shot, line it up on one of the thirds highlighted by your grid and take the shot. Double-check to make sure it looks okay, and if it does, you’re following the rule of thirds.
Professional photographs follow the rule of thirds for a lot of their shots, which is why you can do the same with your shots.

6. Use Portrait Mode
Most people who get into iPhone photography might think that using landscape mode is the way you should take your photos. The truth is, portrait mode is the best option for photography.
For those of you who don’t know, portrait mode is the normal vertical way of holding an iPhone while taking a photo. Whereas landscape mode is when you hold an iPhone horizontally as a rectangle.
Most people think that landscape mode is a better option since it gets more of the shot in it, but the reality is that the camera on an iPhone was designed for portrait mode. Shooting in portrait mode will be of higher quality and will produce better-looking photos.
It might seem odd at first, but a few steps backward and you’ll be able to take that large depth of field you would’ve gotten in landscape mode.
7. Use HDR Mode
Something a lot of iPhone users might not know is that you can change the quality of the photos you take. Meaning that the initial settings of your camera aren’t on the highest possible quality it can be on. To help with the overall quality of your photos, turn HDR (High Dynamic Range) mode on.
To turn on HDR mode, open Camera app on your iPhone, then tap on the HDR button in the top-left corner. Choose the “On” option. Then you’ll notice a change in quality for your photos, especially when you are capturing a high-contrast scene.
You may also choose the “Auto” option so that your iPhone will determine when to use HDR. But if you want to take more professional photos with iPhone, it is better to disable the Auto option.
8. Use Burst Mode
With a regular camera, photographers will take a burst of shots at their subject to make sure they got the exact shot they intended to get. Why wouldn’t you do the same thing with your own iPhone photography?
To utilize burst mode, you can do this by either pressing and holding the shutter or volume button. Once you do this, you’ll notice the camera firing off a burst of photos.
Hold either the shutter button or volume button until you think you took enough photos. To review and select a photo from your burst of photos, go to Photos, tap on Select, scroll through and tap the photos you want to keep.
Once you’re all set, tap Done and choose whether you’d like to keep the photos you selected or all of them. It’s as easy as that and just another great tool that is a part of how to take good photos with iPhone.
9.Edit Your Photos with Filter
Another component professional photographers utilize is the post-processing software they use on their photos once they’ve taken a shot they like.
If professional photographers use Lightroom or Photoshop to enhance their photos, why shouldn’t you utilize different filters to enhance your photos?

Under the Edit tab of your photo, you can find a variety of options choose from, including filters. You can also use some photo editing apps that will improve your photos exactly how you want them to be.
However, keep in mind to not overedit your photos. Overediting is a major issue amateur photographers have, so for the most part, remember to only compliment the picture and not overdo it.


Warm Tip: If you accidentally deleted some great pictures from your iPhone, you can always use some third-party software like Jihosoft iPhone Data Recovery to retrieve deleted photos on the iPhone.