5 Ways to Recover Permanently Deleted Photos from iPhone
iPhone has attracted numerous users all over the world by virtue of its various awesome features including taking high quality photos. iPhone users always use camera in iPhone to record wonderful moments. However, the photos can be permanently deleted from iPhone accidentally . How to deal with the problem when it happens? Here are some apt and workable methods of how to retrieve permanently deleted photos on iPhone.
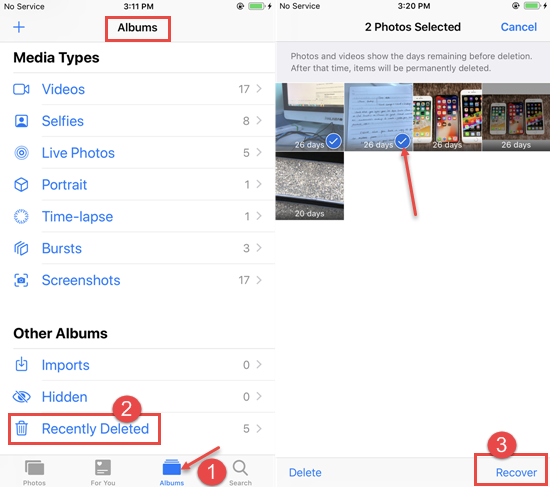
Method 1: Recover from Recently Deleted Folder
When you accidentally delete some photos from iPhone, it doesn’t always mean they are completely erased from your device. The design of iPhone is good as the recently deleted photos will be kept under the Recently Deleted folder for 30 days. If the deletion is within this period, you can restore photos easily from this folder as the steps below.
- Open the Photo app on your iPhone and tap “Albums” which is on the bottom of the interface to get in.
- Scroll down and you will find a folder named as “Recently Deleted” under “Other Albums” folder. Then click it.
- Select the deleted photos you want to need to retrieve and click “Recover”.
This method only works for the photos you deleted. It is useless for those photos lost by other factors or having been deleted over 30 days.
Method 2: Restore Permanently Deleted Photos from iCloud Backup
What if the permanently deleted photos cannot be recovered from Recently Deleted Folder? There is no need to worry if you had backed up your photos on iCloud. You can restore photos to iPhone as below.
- Step 1: Tap on Settings> General > Reset > Erase All Content and Settings.
- Step 2:If asked, enter your passcode or Apple ID password. And wait for your iPhone to erase.
- Step 3:When arrive in the Apps & Data screen, tap “Restore from iCloud Backup”. And then enter your iCloud account.
- Step 4: Choose a backup from a list of available backup archives.
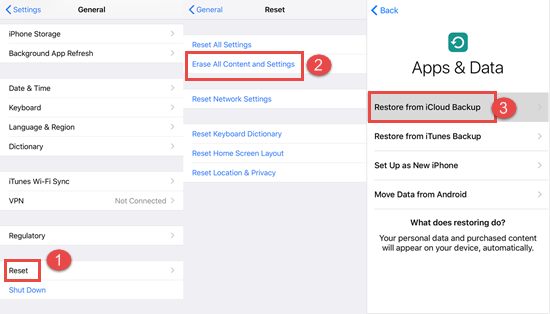
Please kindly note that restoring a backup from iCloud will overwrite the existing content of your device with the content in the backup. If you are afraid that some of vital data will be overwritten or lost, you can skip this method and go to the method 5 directly.
Method 3: Recover Permanently Deleted iPhone photos from Backup in iTunes
Every Time you sync your iPhone to iTunes or your iCloud account, a backup will be made automatically as long as you don’t turn this feature off. It ensures you have a copy of your photos and other data to restore from. Let’s see how to retrieve deleted photos using iTunes Backup.
- Connect your iPhone to your computer and launch iTunes.
- Click your device icon when it appears in iTunes
- Select “Restore Backup”
- Choose the backup that you want to restore, and click “Restore”
- Keep your device connected until the entire process is complete.
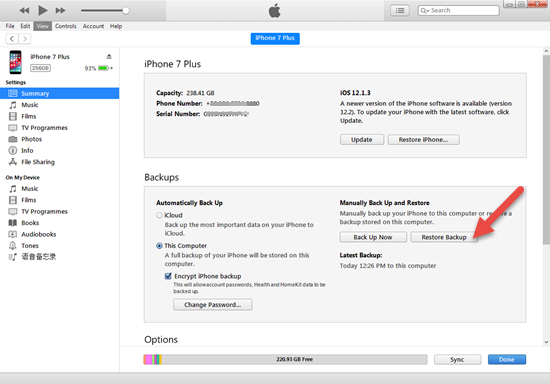
Restoring permanently deleted photos from iTunes Backup has the same problem with it from iCloud Backup. So please make sure you have backed up important files before you start this operation. Or you can also skip this method and go to method 5 directly.
Method 4: Retrieve iPhone Photos from Third-party iCloud Storage
There are many online photo storage sites today, for example, google photo, smugmug, 500px, etc. If you ever used one of them, you may get back your permanently deleted photos from the one you used.
Method 5: Restore Permanently Deleted iPhone Photos with Jihosoft iPhone Data Recovery Software
As mentioned before, the existing data can be overwritten when you restore data from iTunes or iCloud backup. If you don’t want to take this risk, you can use the iPhone data recovery software. And It often happens that iPhone users forget to make regular backups of photos on iPhone. In this case, you can also use the iPhone data recovery software. Jihosoft iPhone Data Recovery is typically recommended to you. It is a powerful and user-friendly software. You can recover photos, contacts, etc on iPhone easily–just connect iPhone to the computer, scan the iPhone memory and then recover whatever you want.


This software offers 3 options to to retrieve permanently deleted photos. Here are the details of how to operate it.
Option 1: Recovery from iPhone
Step 1: Connect iPhone to the Computer
After the software launched, make sure your iPhone connected to the computer well and then select the “Start Scan” button.
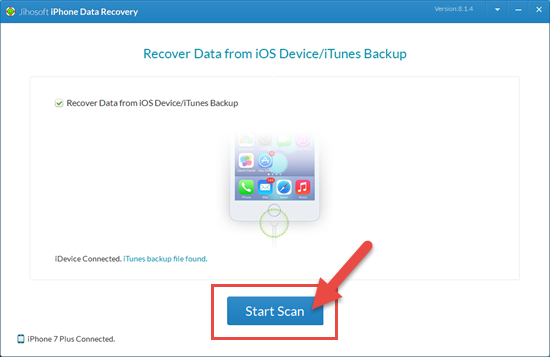
Step 2: Scanning the iOS Device
The program will start a deep and thorough scanning for your iPhone, including deleted photos and existing photos. Please wait for a moment.
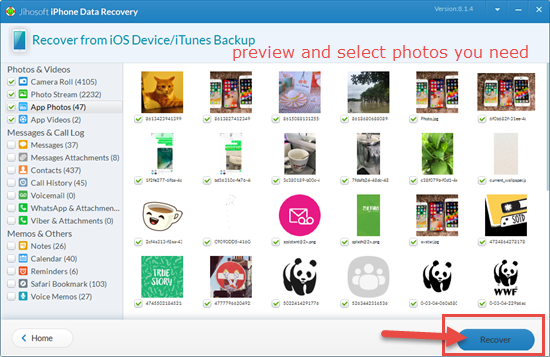
Step3: Preview and Restore Deleted Photos
Both of the deleted photos and existing photos will be presented to you in form of list. You can click each category to preview photos you need to restore, tick them and tap on “Recover” button to export them to your computer.
Option 2: Recovery from iCloud Backup
The greatest merit of restoring permanently deleted photos from iCloud Backup with Jihosoft iPhone Data Recovery is that you can preview and save photos in iCloud backup on your computer directly without wiping out your device. Please follow the steps below.
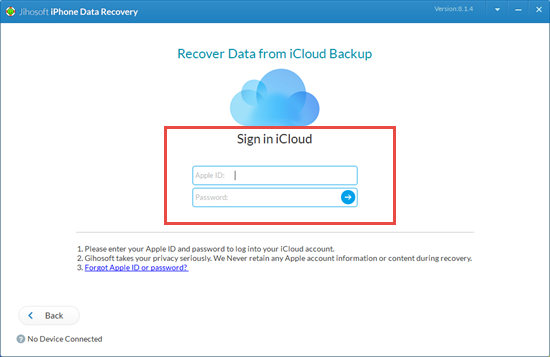
- Step1: Download and open the Jihosoft iPhone Data Recovery software.
- Step 2: Click on “View iCloud Backup”and sign in with your Apple ID and password.
- Step 3: After the scanning is over, select the photos you need and click on “Recover”.
Option 3: Recovery from iTunes Backup
The usage ofthis iPhone data recovery software in option 3 is similar to that of the other two options.
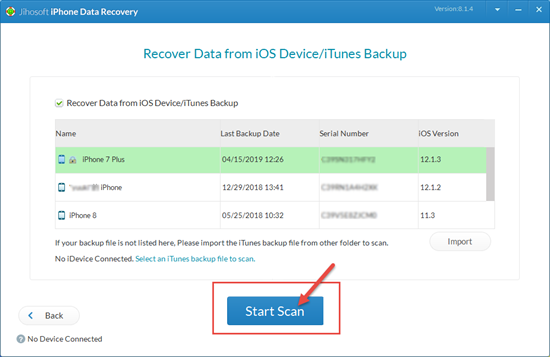
- Step 1: Run the jihosoft iPhone Data Recovery software..
- Step 2: Tap on “View iTunes Backup” and click “Start Scant”.
- Step 3: When the scanning is done, tick the deleted photos you want and select “Recover” button.
In conclusion, iPhone users need make regular backups for some precious photos in case they are deleted permanently. When the deletion happens, you can check the Recently Deleted Folder first. If you are unable to get back permanently deleted photos from the folder, please check on your iClouds or iTunes backup. And you can also check on any third-party iCloud storage you ever used. If you have no backups, you can choose to retrieve them with an iPhone data recovery software. It should be noted that data which has been overwritten cannot be recovered. Thus, the sooner the file recovered, the better it is.
Above all are some methods we collected to recover permanently deleted photos from iPhone, if you have any other good methods, please share them with us.