3 Quick Ways to Backup iPhone/iPad to Computer
Data loss can happen at any time, so a regular backup of your iPhone or iPad is quite important. Apple provides users with two backup methods – iTunes and iCloud. iCloud backup is a good choice as it can be performed on your device automatically without USB connection required. However, despite the convenience of iCloud backup, many users prefer to back up iPhone/iPad to the computer with iTunes. In fact, iTunes is not the only way to backup iPhone to computer. This article will introduce 3 quick ways to backup iPhone/iPad to computer with or without iTunes.
Part 1. Backup iPhone/iPad to Computer with iTunes
Using iTunes is a free and easy way to backup your iPhone or iPad to your computer. You don’t have to rely on any third-party cloud service, and no internet connection is required. Before you start, please update iTunes to the latest version in case some errors appear during the backup process.
- Connect your iPhone/ iPad to the computer via a USB cable. If iTunes doesn’t pop open automatically, open it.
- If asked, follow onscreen steps to choose “Trust This Computer” or type your device passcode.
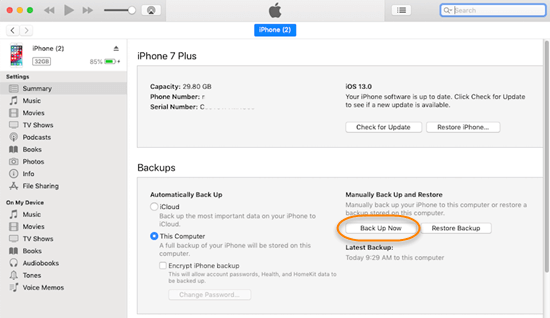
- Click on the device button when it appears in the iTunes window.
- If you want to save Health and Activity data from your device or Apple Watch, you can encrypt your backup: Check “Encrypt local backup”, enter a password, then click “Set Password”.
- Click “Back Up Now” in the Backups section.
- Stay connected until the process ends. You can check the date under Latest Backup to verify if the backup finishes successfully.
Note:
- Backing up iPhone/ iPad to iTunes doesn’t back up your music and apps. If you want to backup your music, you can skip to the option 2 in Part 2.
- Please write down and keep the password you set for your encrypted iTunes backup. If it is lost, there is no way to recover your iTunes backup.
Part 2. Backup iPhone/iPad to Computer without iTunes
Option 1: Backup iPhone/iPad to Mac with Finder
macOS Catalina (version 10.15) is Apple’s new generation version of the macOS operating system. In macOS Catalina, iTunes has been replaced by separate Books, Music, Podcasts, and TV apps. Users now manage iOS devices via Finder. In other words, you can use Finder to backup iPhone/iPad to Mac in macOS Catalina 10.15.
Some users who are used to backing up their devices with iTunes may be worried about not knowing how to use the Finder. Well, there is no need to worry. The Finder window for managing iOS devices is similar to the iTunes interface.
Follow steps below to backup iPhone/iPad to Mac with Finder:
- Use a USB cable to connect your iPhone or iPad to your Mac computer, Then open the Finder window.
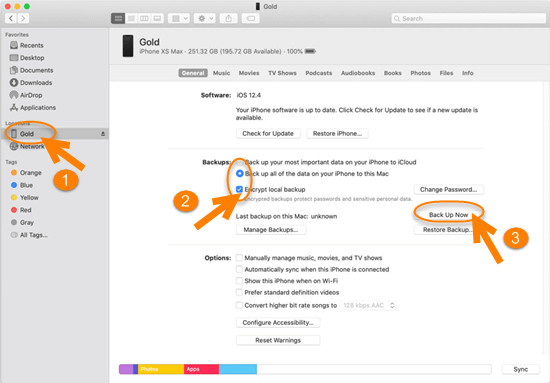
- Select your device under Locations in the Finder window.
- Click on the General tab if it has not been activated.
- In the “Backups” section, you can select either option to back up all the data on your iPad to Mac or back up your most important data to iCloud. You can also check “Encrypt local backup”.
- Click “Back Up Now” to backup your iPhone/iPad to your Mac in macOS Catalina 10.15 or later.
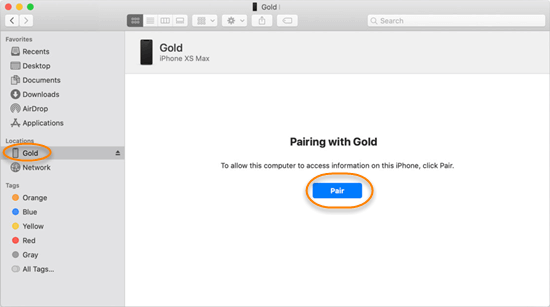
Note: The first time you connect your iPhone/iPad to the Mac with macOS Catalina, you will be required to pair the two devices. Click the “Pair” button in the right preview pane to allow your Mac to access information on your iPad.
Option 2: Backup iPhone/iPad to Computer via Third-Party Software
Both iTunes and Finder are great options for backing up your iPhone or iPad to the computer. But they also have shortcomings – data in the backups is encrypted fragments and doesn’t allow users to view or access them. So many users are looking for alternative ways to backup iPhone/iPad to computer. Using some third-party software like Jihosoft iPhone Manager is a decent choice.


Jihosoft iPhone Manager is a professional software dedicated to managing and transferring iOS data. It can help you transfer & backup your data including photos, videos, contacts, music, messages, notes, etc. from iPhone, iPad or iPod Touch to the computer without using iTunes or Finder. It also allows you to view the contents in the backup file and export data from the backup to readable formats like TXT, PDF, CSV, etc. All these can be done without restoring your iPhone/iPad.
Steps to Backup iPhone/iPad to Computer by Jihosoft iPhone Manager:
- Download, install and launch Jihosoft iPhone Manager on your computer.
- Connect your iPhone/iPad to the computer using a USB cable.
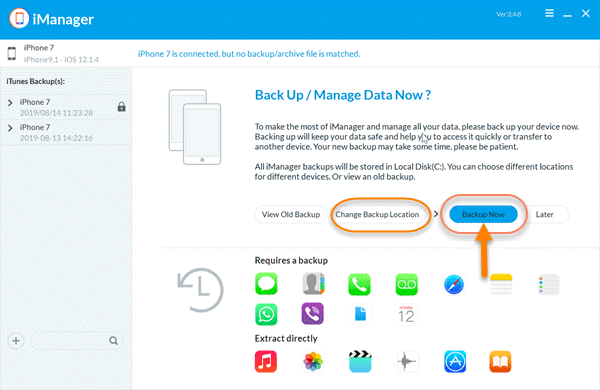
- When your device appears in the left panel, click on “Back Up Now” to start the process.
- You can click “Change Backup Location” to backup your data to a local disk or an external drive.
Bonus Tip: If you have old backups on your computer, you can always use Jihosoft iPhone Manager to locate, view and restore specific data from the iPhone Backup.
- Start Jihosoft iPhone Manager on your computer. All the backups available on your computer will be archived by dates in the left pane.
- Select a backup and click on any data icon you want. Then you will be shown with all the related data inside the selected backup.
- When you find the file you need, mark them and click the export icon at the top to extract them to your computer as readable formats.
Conclusion
The above are three effective ways to backup iPhone/iPad to the computer. Usually, users use iTunes to back up their iPhone to the computer, and in macOS Catalina 10.15 or later, they need to use Finder. If you are looking for a way other than iTunes, you may as well use some reliable third-party software, such as Jihosoft iPhone Manager. You can choose the method that suits you best based on your needs. If you have any queries or suggestions, please let us know in the comment section below.