5 Ways to Transfer Photos from iPhone to iPad Pro/Mini 4 2019
After taking some beautiful photos on your iPhone, you may want to enjoy them on your iPad for its larger screen and better resolution. But how do you get all your iPhone photos onto your iPad to start with? In this article, we will show you 5 simple ways to transfer photos from iPhone 5S/6/6 Plus/6S/6S Plus to iPad Pro, iPad mini 4/3, iPad Air 2, etc.
Method 1: Via Message
The old-fashioned method to transfer pictures from iPhone to iPad is sending them via message.
1.Go to the Photos app on your iPhone and open the picture you want to send.
2.Tap the Share button and select any additional photos, then tap the “Message” option.
3.Enter your iPad’s phone number and tap on “Send”. After the message is sent, it should appear in your iPad’s Message app.
4.Open the message on your iPad, press and hold on the attached image. Then select “Save” to save the pictures to your iPad’s storage.
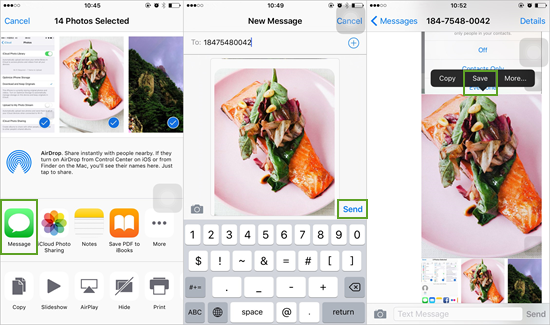
Note: This is a bit more awkward and time-consuming.
Method 2: Via Apple’s AirDrop Service
One of the quickest and easiest ways to send photos from iPhone to iPad is to use Apple’s AirDrop service.
1.Swipe up from the bottom of the screen to open the Control Center on both your iPhone and iPad. Tap the AirDrop button to enable it and select “Contacts Only”.
2.On your iPhone, open the photo you want to share from the Photos app and tap the Share button.
3.Select additional photos you want to transfer, tap your iPad at the top of the Share panel.
4.Tap “Accept” on your iPad. Now the selected photos will be in your iPad’s Photos app.
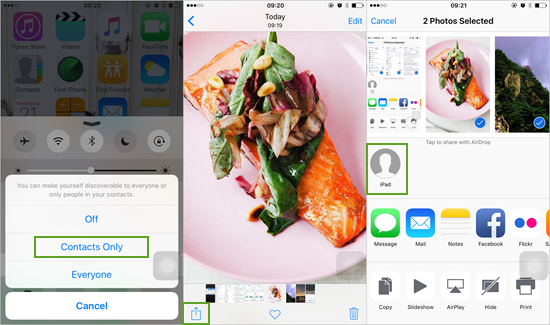
Note: This requires an iPhone 5 or newer and an iPad 4 or newer. Both devices must be running iOS 7 or later.
Method 3: Via Photo Stream
The Photo Stream uploads your newly-taken photos to iCloud when connected to a Wi-Fi network. Then can be accessed from any connected iOS and OS X devices that sign in with the same Apple ID.
1.On both your iPhone and iPad, go to Settings > iCloud and tap the “Photos” option.
2.Toggle the “Upload to My Photo Stream” on to send newly-taken pictures to your Photo Stream.
3.After the photos from your iPhone have uploaded to iCloud, they will also be available on your iPad’s Photos app.
4.On your iPad, open the photos from the Photo Stream that you want to save, tap the Share button, then select “Save Image” or “Save to Camera Roll”.
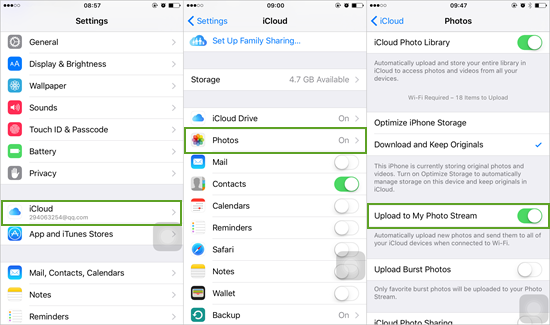
Note: To share old photos using Photo Stream, you’ll need to enable photo sharing on both the iPhone and iPad.
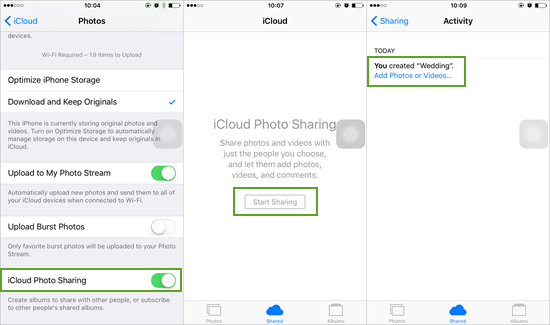
1.On both your iPhone and iPad, go to Settings > iCloud and tap the “Photos” option. Then toggle the “iCloud Photo Sharing” on.
2.Open the Photos app on your iPhone and tap “Shared”. Then tap “Start Sharing” to create a new Shared Album.
3.Your newly-created shared album will appear in the screen, tap “Add Photos or Videos” to add photos you want to share.
4.The photos will be uploaded to iCloud when your iPhone is connected to a Wi-Fi network and you’ll be able to access them from your iPad.
Method 4: Via iCloud Photo Library
The iCloud Photo Library allows you to upload your entire photo collection on your iPhone to your iCloud account. Then you can access them from all of your connected devices like iPad.
1.On your iPhone, go to Settings > iCloud and tap the “Photos” option.
2.Toggle the “iCloud Photo Library” on, and then choose “Optimize iPhone Storage” or “Download and Keep Originals”.
3.Connect your iPhone to a Wi-Fi network to upload your photos to the iCloud Photo Library.
4.Now on your iPad, if you are signed in with the same Apple ID, you will be able to access the photos from the Photos app.
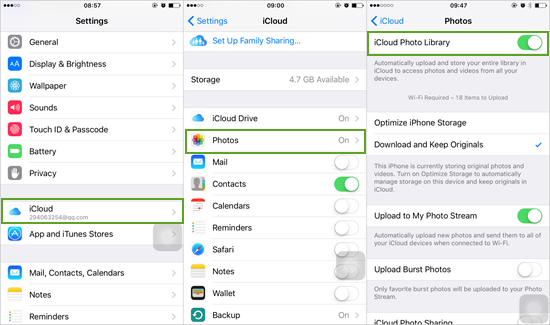
Note: This requires iOS 8.1 or later for both the iPhone and iPad. Turning on the iCloud Photo Library will remove any images that have been synced from iTunes.
Method 5: Via Phone Data Transfer Tool
If you do not like the above ways and look for a direct way, you can make use of Jihosoft Mobile Transfer. This Phone Data Transfer tool helps you share photos between all Apple iDevices, including the latest iPhone 6S/6S Plus, iPad Pro, iPad mini 4, etc.
1.Download and install the Phone Data Transfer tool on your PC or Mac, then launch it.
2.Connect your iPhone and iPad to the computer via USB cables. Make sure the iPad connected as “Destination”.
3.Select Photos and tap on “Start Copy”, the program will transfer photos from iPhone to iPad quickly.
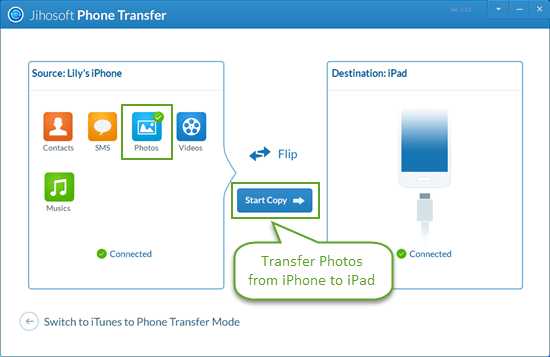
Note: You also can transfer other media files (videos and music) as well as contacts, text messages from iPhone to iPad with one click.

