10 Common Beginner Photography Mistake and How to Avoid
Sometimes, the best way to continually improve photography techniques is to clearly identify our photographic errors and know how to avoid them so as not to fall into the same trap. Otherwise, periodically we may repeat the same mistakes and not know how to overcome them and leave them behind.

In today’s article we will illustrate the 10 worst photography mistakes, and some photography tips and tricks for beginners.
# 1 Forget the Center of the Image
There is a natural tendency to place the subject of our scene in the geometric center of the image. We think that this way we give greater emphasis to the subject in our shoot. Actually, except in symmetrical compositions, it is not very appropriate. Have you heard of the rule of thirds?
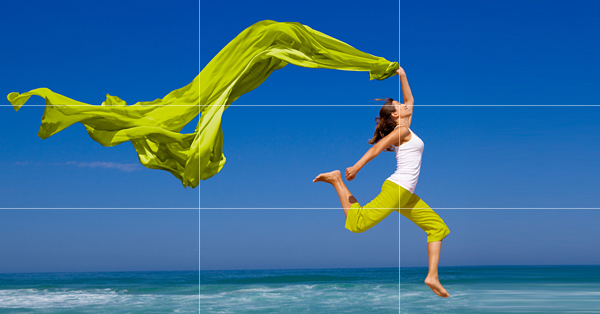
What should we do? Very simple, instead of placing the main subject in the center of our image, try to place him in one of the lines or strong points of the frame. Don’t know what it is? Find out in this simple article about the rule of thirds.
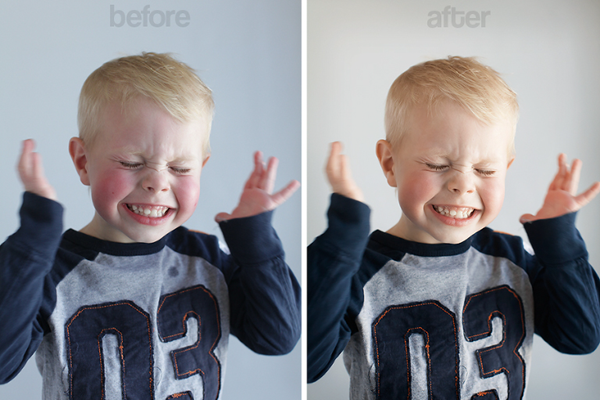
# 2 Give More Space To Your Composition
Another beginner photography mistake that we tend to make is to focus excessively on the frame of the subject to be photographed, thus restrain it within the composition. It is true that for certain shots, for example, the portrait or macro photography, it is recommended to fill in the frame. However, think of other situations in which a subject is shown in motion, don’t you think that we should leave some free space in our images in that type of shots?
What should we do? There is a rule known as the rule of space and a sister rule that is the rule of gaze, which speak of the need to offer enough space for the subject to look into, if the subject isn’t looking directly to the camera. Then there should always be a little more space ahead of the subject. For example, when you look at a portrait you are inclined to follow the subject’s gaze, and he or she needs an area to look into.

# 3 Choose Good White Balance
It’s not always easy for our camera to determine the target in a scene like humans do. And that is why we have to give information about the type of lighting that is present in the image and then, depending on this type of lighting, the camera can “interpret” the target appropriately and return appropriate colors.
If you don’t have the right white balance, your shoots will not reflect the actual color as what they are in reality.
How to solve it? First, always shoot in RAW to be able to vary the white balance without loss of information in the post-production of the image. Secondly, help yourself with gadgets such as a gray card which is the most common way to get precise colors and exposure.
Tip: How to View RAW images on Windows 10 computer?
# 4 Do not Underexpose or Overexpose
We said that the camera does not know how to determine the target at the color level, but the truth is that it does not know how to determine it at the level of exposure. In fact, our camera is looking for an adequate exposure for what is known as medium gray. For those images that do not offer on average a response similar to that returned by a scene completely formed by this color, the camera will make a mistake.
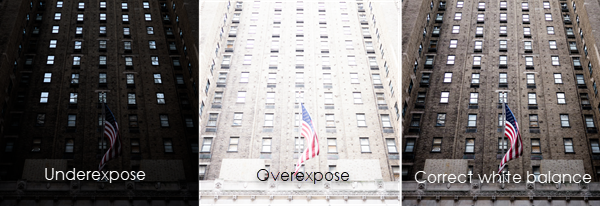
How to solve it? Make use of the exposure compensation settings offered by your camera, monitor the histogram after each photograph and try to such a photograph contains no lost highlights or shadows, meaning all the details are clearly distinguishable and as close as possible to “real life”.
# 5 Focus on the Subject of Interest
No matter how well thought out the composition of the scene you are photographing, you know that our eyes will only be able to “rest” on those subjects that are correctly focused and clearly pointed out .
How to solve it? First of all you have to know all the focus modes offered by your camera. Then, ensure that there is enough contrast on the surface that you intend to establish the focus plane, zoom in on the focus plane to ensure correct focus, and use a time of adequate exposure depending on the focus and movement of the subject. And finally, maintain a proper position and control breathing to make a good shot.
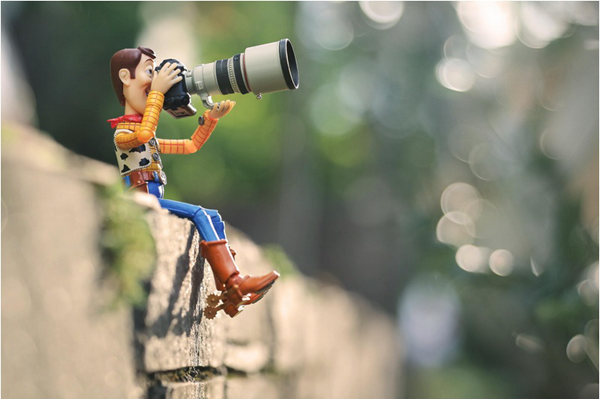
# 6 Look for a Good Background
When we are going to take a photograph, we focus on the subject which will call the attention of the viewers and, once we are clear about it, we tend to shoot quickly. However, this entails not thinking that the background of the composition may ruin the foreground. However good it may be, we still have to work hard to achieve an appropriate background. You have to know that the background in your shoot can quickly reveal your skill level as a photographer.

How to solve it? Very simple, once you have determined the main subject of the composition, forget about it and focus on cleaning the background. Try to soften the background or blur it so that the subject has even more prominence if possible. And you can move,and vary the angle and the direction of the shot.
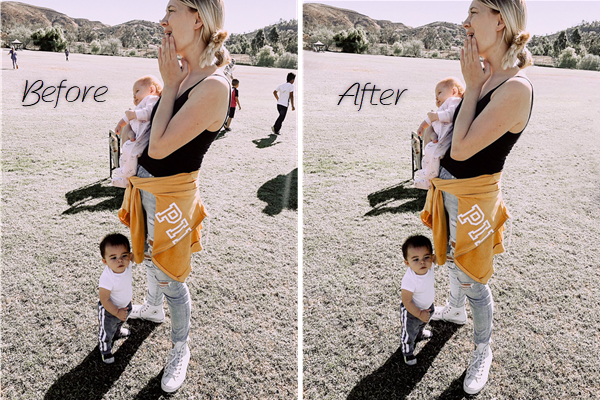
If there are some unwanted stuffs already appearing in your finished shoots, how to get rid of them? Try to remove the unwanted people or objects from photos with Photo Eraser software.


# 7 Get a Straight Horizon
This error also usually originates by focusing excessively on the main subject of the composition and forgetting that it is more advisable that the horizon line should be straight. Well, in those cases the difference in the horizon is usually important.

How to solve it? Try to solve it at the time of taking the picture by physical or electronic levels (some cameras offer this functionality on the display) or, if it is too late, straighten the photograph by post process.
# 8 Simplify Your Images
This is another worst photography common mistake: try to include as many elements as possible in the photograph. Your camera does capture everything in front of it, however, this can only lead to a cluttered, messy photo with no clear focal point.

How to solve it? As we said with the advice on the simplification of the scene, it is important to separate the object from other stuffs and tell your viewer what’s important in the frame by changing the point of view, the variation of the framing or focal, reducing the depth of field, etc. Most importantly, to reduce the number of elements in the image, or to blur those objects that are secondary.
# 9 Create Third Dimension Photography
This error is not easy to detect without proper experience, when you begin to realize that, you must overcome the limitation that photography turns the world of three dimensions into two. And we have to create photographs that give viewers a three-dimensional vision by using lighting, and composition.

How to solve it? We can use wide-angle lenses which are the most effective way to create compositions that offer a three-dimensional effect. The wider field of view makes it easier to work with a larger number of eye-catching subjects, while the greater depth of field makes it possible to work with subjects up close. And there are several ways to create a sense of depth, such as through focus, color, light, atmosphere and the emotional power of the subject.
# 10 Analyze The Light Of The Scene Before Shooting
Again, an error that we usually make by focusing on the subject to be photographed without considering the fundamental elements that will affect the final shooting result, such as the light of the scene. Lighting is a key factor in creating a successful image. So even the background is good enough, but if the light has not been taken care of we will have a problem: we may not have a homogeneous exposure, or we may have an illuminated subject.
How to solve it? Undoubtedly, the way to avoid this is to pay close attention to the light before photography, either modify this light with diffusers, or complement it with fill-flash and reflectors, and try to change the position of the subject.
Any Other Error And The Way To Resolve It?
And, of course, we should not make these 10 mistakes again, and we must try to follow the indicated tips to get better photographs. Which mistake do you think is the worst one? Not included in the list? That said, it is your turn to contribute # 11 , or to propose other alternatives to solve some of the photography errors mentioned above. Surely you have alternative solutions, right?