How to Import Contacts from iPhone to Mac without iCloud
iCloud is an exclusive service enjoyed by Apple users. It can sync contacts, photos, and many other data between your iPhone, iPad, iPod touch, Mac, and even Windows PC wirelessly, as long as you’ve set up iCloud and login to the same iCloud account on all of these devices. However, on account of the limited iCloud space and possible iCloud malfunctions, many a loyal Apple user who has both an iPhone and Mac may ask the question, “How do I transfer contacts from my iPhone to Mac without iCloud?”. If that’s the case with you, this post comes in handy for you. Here we will show you how to import contacts from the iPhone to Mac without iCloud.
Method 1: Import Contacts from iPhone to Mac Using iTunes or Finder
Like iCloud, iTunes is the other frequently-used service for Apple users. If you use macOS Mojave or earlier, You can use iTunes to import the contacts from iPhone to your Mac without iCloud. If you use macOS Catalina, you can use the Finder. Before you decide to adopt this way, please put in mind that if you deleted the contacts that have been synced from the iPhone to Mac via iTunes, they would be automatically deleted from your iPhone the next time you sync your iPhone to Mac via iTunes. Now let’s see how to use iTunes to sync contacts from iPhone to Mac without backup.
- Step 1: Launch iTunes or Finder on your Mac and connect your iPhone to Mac with a USB cable. If asked, tap “Trust This Computer” on your iPhone screen to go on.
- Step 2: Then click on the device icon when it appears on the iTunes interface. In the Finder window, select your device in the sidebar.
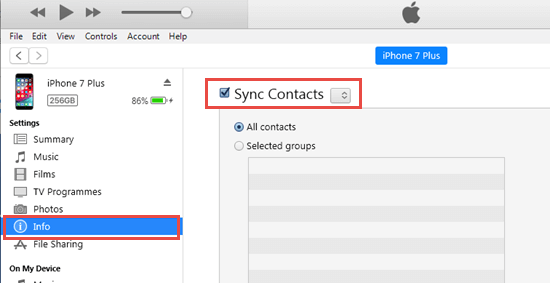
- Step 3: Select “Info” and tick “Sync Contacts”. After that, click the “Apply” button.
Notes:
- If you use OS X v.10.9.5 or later, you can only sync contacts and calendars from iPhone to Mac. Other types of data will be updated on your Mac and iPhone via iCloud.
- When you are syncing contacts to Mac with iTunes, make sure it only syncs your contacts only, or you may have problems syncing.
- If you don’t want any data loss to happen, you can back up the iPhone with iTunes or Finder on your Mac. Then you may use some third-party iPhone Backup Extractor tool to extract the contacts to your computer.
Method 2: Get Contacts from iPhone to Mac with AirDrop
AirDrop is particularly developed by Apple Inc. for iOS and macOS operating systems, which helps to share and receive photos, documents, and more among Apple devices nearby over Bluetooth and Wi-Fi. You can transfer contacts from your iPhone to Mac with AirDrop as long as your Mac is launched from 2012 or later (excluding the mid-2012 Mac Pro) using OS X Yosemite or later, and your phone is launched after iPhone 5 running iOS 7 or later.
- Connect both your iPhone and Mac to a stable Wi-Fi network. It is OK if they are connected to different Wi-Fi networks.
- On the iPhone, go to Settings > Bluetooth and turn on the Bluetooth. On Mac, go to Apple menu > System Preferences > Bluetooth and turn it on.
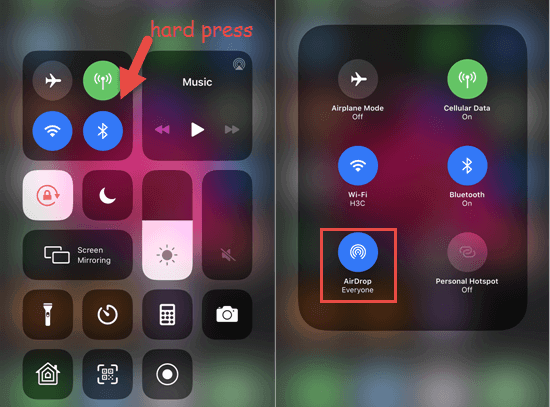
- Enable AirDrop on iPhone. On your iPhone screen, slide up to open the Control Center(If you are using iPhone X or later, swipe down from the upper-right corner), hard press the network settings card and tap AirDrop, then select “Contacts Only” or “Everyone”.
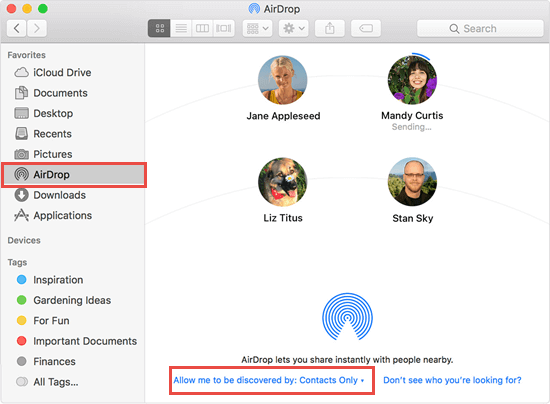
- Activate AirDrop on Mac. Go to Finder > Go > AirDrop, click “Allow me to be discovered by:” and choose “Contacts Only” or “Everyone”.
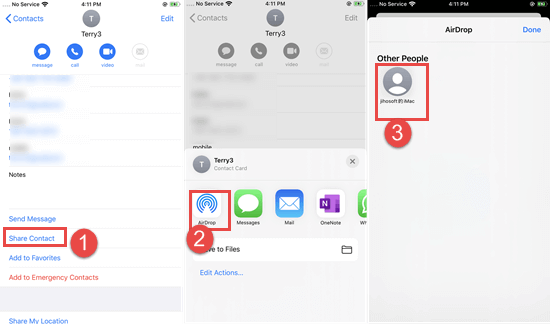
- After that, open the Contacts app on your iPhone, click on a contact, and then tap “Share Contact”.
- Select “AirDrop” and tap your Mac’s name to start transferring.
- You’ll see a request in the AirDrop window or as a notification on your Mac screen. Just accept it. The contacts you received on your Mac will be saved to the Downloads folder.
Note: Please make sure your iPhone and Mac are within 30 feet of each other, or you may fail to see the other device in AirDrop.
Method 3: Transfer iPhone Contacts to Mac via Jihosoft iPhone Data Recovery
Jihosoft iPhone Data Recovery is an iPhone recovery software that can recover deleted or lost data, including contacts, photos, videos, messages, notes, WhatsApp, and more App data from iOS directly or iTunes/iCloud backup. It also doubles a data transfer tool that helps you transfer contacts together with other existing and deleted data from your iPhone to the Mac or Windows PC via a USB cable. It is compatible with all iOS devices and iOS versions, including iPhone 11 and iOS 13. Here are detailed steps for how to import contacts from iPhone to Mac with Jihosoft iPhone Data Recovery.


- Step 1: Download, install and open the relevant version of this program on your Mac.
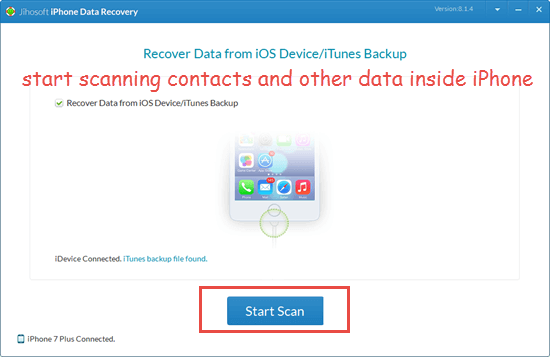
- Step 2: Connect your iPhone to the computer via a USB cable. Click the “Start Scan” button to start scanning when the program detects your device.
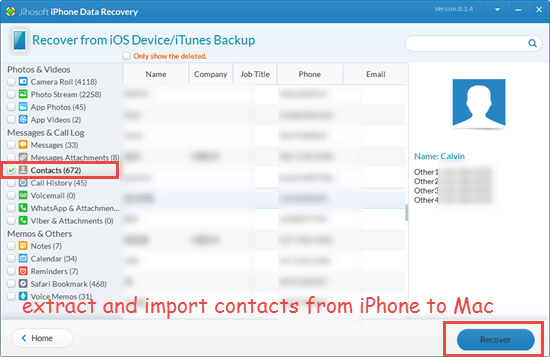
- Step 3: When it finishes scanning, all your iPhone data will be displayed on the interface. If you only want to transfer the contacts, check the box next to “Contacts” and uncheck others, then click the “Recover” button to save your contacts to the Mac.
With Jihosoft iPhone Data Recovery, you can mass transfer the contacts from your iPhone to Mac in one click. It can also be used to extract contacts and other data from backups on your Mac.
Final Words
As you read in this article, iCloud is not the only way to import the contacts from your iPhone to Mac. If you have one or several iPhone contacts to transfer to Mac without iCloud, you can get it done easily with AirDrop. If you have massive contacts to transfer, you can import these contacts from your iPhone to Mac via Jihosoft iPhone Data Recovery. Each method is better in some respects than in others. You can select the one that fits your needs best. If you have any queries and suggestions, please leave them in the comment section below.