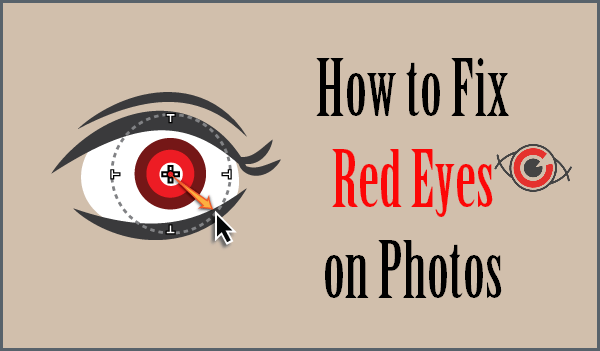
Red Eye Removal – How to Fix Red Eyes in Photos
Shooting in low light or in the night (with the flash on) generally results in the photos with a red eye effect. And, no matter who you have captured, the subjects with red eyes in the pictures look scary and ugly. This kind of defect is enough to destroy the quality of your photos and it needs to be fixed.
What Causes Red Eyes on Photos?
As we mentioned before, red eye happens when you capture a photo in low light with the flash on. When the flash light hits the subject’s eyes, it enters through the pupil and is reflected by the blood vessels at the back. This is what makes the subject’s pupils appear to glow red.
There are also some precautions that you can take to avoid this defect. Turning off the flash-light and shooting in the natural light (if possible) are such precautions that you can consider. But for your existing photos with red eye effect, you can refer to the following methods on how to fix red eye on pictures with different photo editing software.
OPTION 1. Red Eye Removal with Photoshop
If you have a graphic design and photo editing software like Photoshop, you will love the editing quality offered by it. Along with a large number of other advanced photo editing tools, it also offers a specific tool for fixing red eyes in photos. The process of fixing this defect by using Photoshop is very easy to go through once you learn it. Follow the steps given below:
- Browse and open the photo with red eyes in Photoshop. You can simply drag and drop it or use the option ‘Open’ in the File menu.
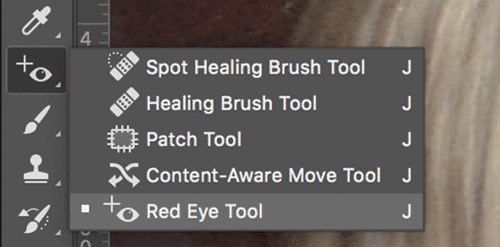
- Locate the ‘Spot Healing Tool’ in the toolbar given on the left side of the workspace.
- When you select the ‘Spot Healing Tool’, it will open up multiple tools to choose from.
- Out of these multiple tools (listed under the ‘Spot Healing Tool’), locate and select the ‘Red Eye Tool’ given at the bottom.
- Now go to the top of the workspace in order to update the values of ‘Darken Amount’ and ‘Pupil Size’. Set both of them equal to 50%.
- Form a square around the pupil of the red eye in the photo, by clicking and dragging the mouse.
- Move the square up and down in order to position it in a way that the pupil lies in the center.
- Now release the mouse and that’s it!
If you find something that you don’t want appear in the photo too, then you can also use Photoshop to remove them. And there is a more efficient tool that can help you edit unwanted objects out of the photos. That is Jihosoft Photo Eraser, which is an easy-to-use photo editing software for you to erase any photo-bomber with a single click. Moreover, it even allows you to remove censored parts from photos easily and quickly.


OPTION 2. How to Remove Red Eye in Lightroom
Like Photoshop, Lightroom also makes it super easy for us to fix red eyes on photos. Now follow along with the steps below to learn how to remove red eye in photos with Lightroom in just a few clicks.
- Launch Lightroom,and switch to the Develop module.
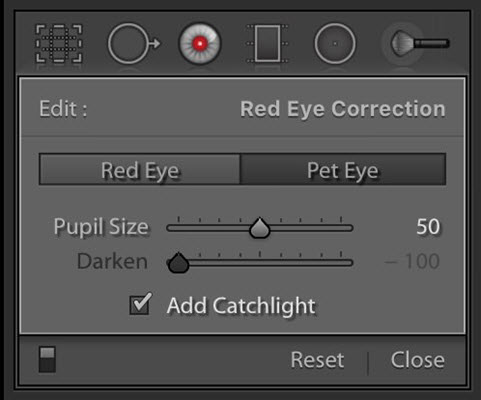
- Select the Red Eye Correction tool from the right column of Lightroom.
- Then choose the Red Eye option which will correct the red tones that reflect in people’s eyes. If you choose the Pet Eye option, it will help you correct animals’ eyes in green-yellow tones.
- Starting at the center of the red eye, draw a circle over the pupil of the affected eye, then release.
- After you have selected the red eye, you can adjust the pupil size and darkness through the sliders on the left side of the Lightroom.
- Now you can do the same process to fix the other eye after you have one red eye done.
OPTION 3. Remove Red Eye on Android
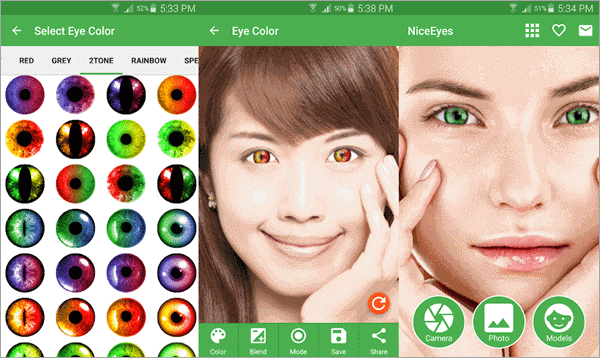
There are some red eye removal apps which you can use on your Android device or phone to successfully remove the red eyes from photos. Some of the popular apps are Visage, Pixlr, Adobe Photoshop Express, Eye Color Changer, Eye Color Studio, Eye Lens Color Changer, etc. As a demonstration on the process of fixing red eyes with a red eye removal app, I will discuss the procedure to be followed in the Eye Color Changer app to accomplish this task.
Steps to be followed in the Eye Color Changer are as follows:
- Launch the app and tap on the photo icon available in the app.
- Locate the file where your photo is stored. Select the photo and load it into the app.
- You will see an eye tool on the photo that you have loaded. In order to drag the eye tool, you will have to click and hold it first. Now, drag this tool to the location where there is red eye in the picture.
- Zoom in to complete the fixing with more accuracy.
- When you have completed the fixing, click “OK” and that’s it.
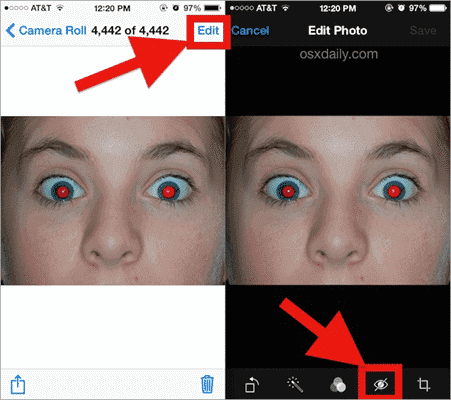
OPTION 4. Remove Red Eye on iPhone
If you have an iPhone, there is a piece of good news for you. You don’t have to waste your money on any third party app to fix the red eyes in your photos. The iPhone comes with an inbuilt photo editing tool (in your photos app) which offers a specific feature for fixing the red eye effect.
Go through the following steps to remove red eye on iPhone:
- Go to the Photos app and select the photo with a red eye effect.
- On the top right, there is an “Edit” button, tap it.
- Now, tap on the red eye removal tool button, which appears as a eye icon with a slash through it.
- The editor will now display a prompt “Tap each red eye”. Follow this instruction. You can also tap the same eye for the multiple times if needed.
- Now tap “Done” and that’s it.
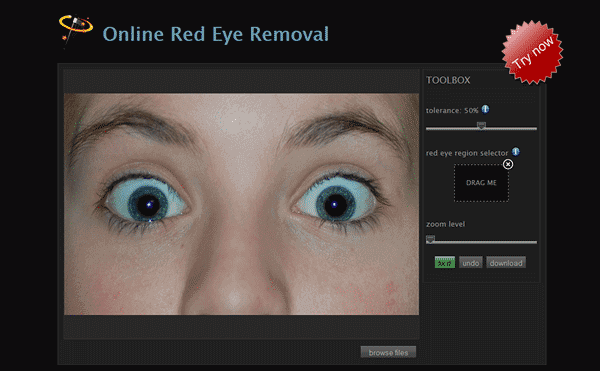
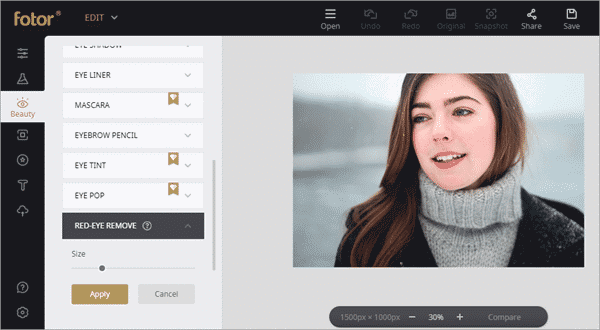
OPTION 5. Remove Red Eye Online
If you have access to the internet, you don’t need to worry about whether or not your photo editing app facilitates the red eye removal feature. Just go online and use online red eye removal tools like FixRedEyes and fotor.
In FixRedEyes, the steps that you need to go through in order to fix the red eyes in photos are as follows:
- Go to www.fixredeyes.com.
- Click on the “Browse files” button provided at the bottom right corner.
- Locate the file where your picture is stored. Select the picture and load it into the FixRedEyes. The maximum size of image accepted by the FixRedEyes tool is 5 MB.
- Use the red eye region selector (given on the right side) to select the area in the picture where the red eye effect exists.
- Now click the “Fix it” button to fix the red eyes.
- If you are satisfied with the result obtained after fixing, you can download the modified picture by clicking the “Download’ button given on the right side. And that’s it!
And, if you are using fotor red eye remover, go through the simple steps as mentioned below: - Firstly, you should go to www.fotor.com and then open the picture that you want to edit.
- Now make use of the red eye remover offered by fotor. Click the red eye in order to fix it.
- Finish the modification process and save your modified photo. That’s it!
Conclusion
As we have noticed above, there are a few simple and easy ways to fix the red eyes in photos, irrespective of the software or online tool you make use of. There are so many other tools and methods which you can use to fix this defect. But the tools mentioned above are the ones which are used in most of the cases.
There are times when you have captured fabulous pictures but the only thing that has disturbed the beauty of your pictures is the red eye effect. Why compromise with the quality due to this defect when you have so many solutions available for fixing it? Pick any of above-listed tools (which you have easy access to) and make your photos as pretty as you can.