How to Take Screenshot on Windows 10 with 5 Easy Methods
Taking screenshot of the display screen is a very common scene in smartphones. Because there are some instances when the information which is getting displayed on the screen might not be accessible again, that’s why taking the screenshot of the screen will help you to get the exact details and visuals. The applications of screenshot can surely make a long list. However, apart from Android or iPhone, have you ever tried to take screenshot in Windows 10 PC?

In this article, we will mention 5 methods to help you take either full or partial screenshot. By partial screenshot, we simply mean that you can capture the limited part of the display screen which you want to. Moreover, we will also reveal some of the in-built utilities and features available in Windows 10 which are pretty help in taking the pictures of the display screen.
It is not suggested for any Windows users to install any unknown third-party application which pretends to help you in taking the screenshot. We have some cases in which our users have installed some third-party application and later on, they end up in losing their privacy or data, in which case we always recommend the best photo recovery software.


Method 1. Take Screenshot with Print Screen Key on Windows 10
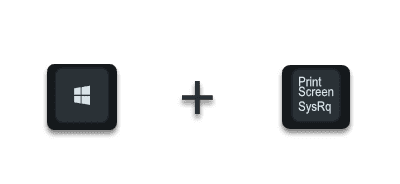
Print Screen key, either it is presenting as PrtScn, PrtSc SysRq, or other similar form on your keyboard, is the primary method of taking the screenshot in Windows PC. By the use of Print Screen key, you can either take a screenshot which you can save as a file or you can also take a screenshot which will get copied on the clipboard of your PC. You can just paste that Screenshot which get copied in the clipboard of your PC. We will discuss both types of method which involves the saving of file and also, which doesn’t involves saving of file. Besides, the screenshots taken by the key is default to be the whole screen.
How to take screenshot to save that as a file:
If you want to take the screenshot the display screen of your Windows 10 PC and save it as file, then just press the “Windows + PrtScn” keyboard shortcut. A screenshot file will directly get saved in the Screenshot folder present in the “My computer” section. Just open the screen of which you want to take the screenshot and use the above keyboard shortcut to take the screenshot. The file which get saved in the Screenshot folder can be open with a suitable Image viewing app where it can be edited very easily.
How to take screenshot without saving it as a file:
If you are working on project and suppose if you need to mention a screenshot in your document, then rather than taking the screenshot and saving it as a file, you can take the screenshot to save it on the clipboard and from there, you can easily paste that screenshot in to your document. For this purpose, you need to press the “Prtsc” key which is probably present on the top right corner of every keyboard. Pressing this key will take a screenshot of the display screen and send it to the Clipboard. So, definitely a very effective method which will do your job without consuming a single bit of data from your hard drive.

Method 2. How to Take Partial Screenshot with Shortcut
As we have mentioned above, there are also methods for taking the screenshot of the partial screen. If you just want to capture the limited part of the screen, then you have to press the “Windows + Shift + S” keyboard shortcut which will make a milky white effect on your PC’s screen where you will find mouse cursor, which can be dragged anywhere on the screen to capture the limited part which you want.
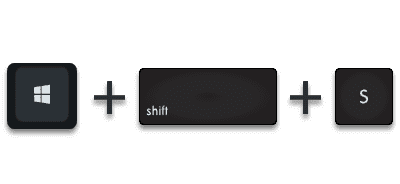
This is really an easy way to take partial screenshot of your screen because there are some instances when you don’t want to share all the information which is displaying on your PC’s screen. So, the effective way in which you can capture the limited part of your screen is by using the “Windows + Shift + S” keyboard shortcut. We will discuss about the snipping which is pretty much similar to this method below. So, let’s move further on next method.
Method 3. How to Take Screenshot Flexibly with Snipping Tool
Snipping tool is an in-built tool present on the Windows 10 PC which is really very help to cover the limited part of the screen as a picture or we can say a screenshot. The working of snipping tool is pretty much similar to the working of the above-mentioned method. But the main difference between the two is that using snipping tool, you can save the file instantly on the hard drive of your PC. You can name the file and can store that file on any location wherever you want. Whereas if you use “Windows + Shift + S” keyboard shortcut, then the area which you drag to capture will be saved in the clipboard of your PC. You cannot save that file on your PC instantly unlike the Snipping tool.
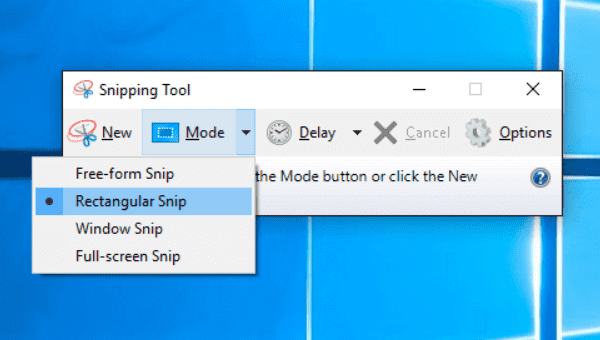
So, if you want to use Snipping tool to take partial screenshots, then just press the Start key present on the keyboard and search for the Snipping tool in the search box. When you open Snipping tool, you will find an option named as “New”. Press that option and capture the limited part of your screen by dragging the edges of the small square which will be presented on your screen for the first time.
Method 4. Using the Game bar to Screenshot on Windows 10
We all know that almost every type of PC game is compatible with the Windows 10. So, an alternate method to take the screenshot is by using the Xbox of the game bar. Most of the games are providing the feature of recording of the play in video or image. So, if you enable the option of “Take screenshot using Game DVR”, then you can easily take the screenshots on your Windows 10 PC. Just search for the Xbox in the search menu of start window to enable the settings. You can also set the keys which you want to use to take screenshots on your PC. Setting up of the easiest combination of the keyboard shortcuts will definitely help you to take screenshots very easily. The default shortcut for opening Game bar is Windows + G.
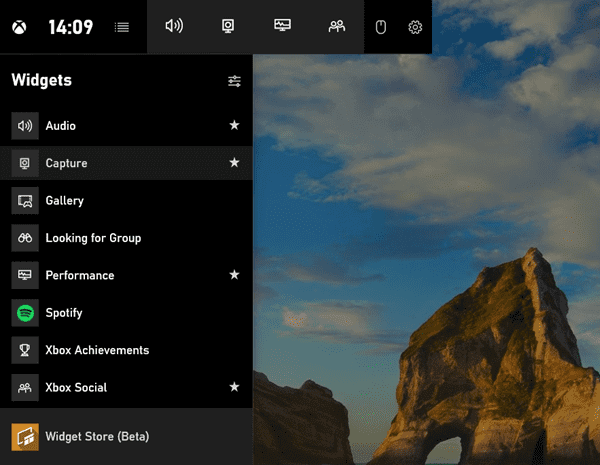
Every time you will take a screenshot on your PC, you will get a notification and if you open that notification, you will get all the screenshots which are saved on your PC. This is the easiest method to take screenshots till now because this feature helps the users to set their preferable keyboard shortcut to get a screenshot.
Method 5. How to Take Screenshot with Screen Capture Tool
We don’t recommend third-party tools for taking screenshots. It is not only because of the risks but also it is not necessary with all the above handy methods available. However, there is also a reason for some people to search for such an option. That’s why we add a quality screenshot tool here.
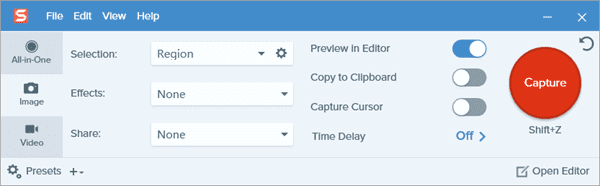
Snagit is one of the best screenshot tools, but the best part is its role as a powerful photo editing tool. The premium version of this tool will bring some more exciting editing tools which will help you take attractive screenshot. The premium version will also allow you to set your favorite keyboard shortcut to take screenshots. Yes, Snagit is not free. If none of the above 4 free methods can meet your needs, then maybe only a paid tool will be qualified. Of course, there are many free photos editors for Windows for the very purpose.
Conclusion
So, these are the best 5 methods to screenshot on Windows 10 PC. There may be a chance that some of the users will face issues while taking screenshots on their PC with the suggested keyboard shortcuts because some computers have different architecture. Please tell us your problem here in the comments section below so that we can recommend you the best solution.