How To Create Watermark Logo in Photoshop and Online
Just adding your business logo as a watermark to your photographs can protect you from copyright theft to a large extent. So why not create a logo which will not only reflect the nature of your business but also play its role as a watermark on your photos? Below we have discussed two methods to create a watermark logo (one with the use of Photoshop and the other with the use of an online watermark logo maker tool).
![]()
Part 1. How To Make A Watermark Logo In Photoshop?
Using the popular photo editing software like Photoshop makes it very simple and easy to make a watermark logo. In this article, we are going to learn the whole process of creating a text logo step by step in Photoshop. Follow the simple 5 steps given below:
STEP 1: Create Text
First, launch Photoshop on your computer and open a new document in it. Take your pointer to the toolbar displayed on the left-hand side and select the text tool available over there. Now draw out a text box and start typing your brand name.
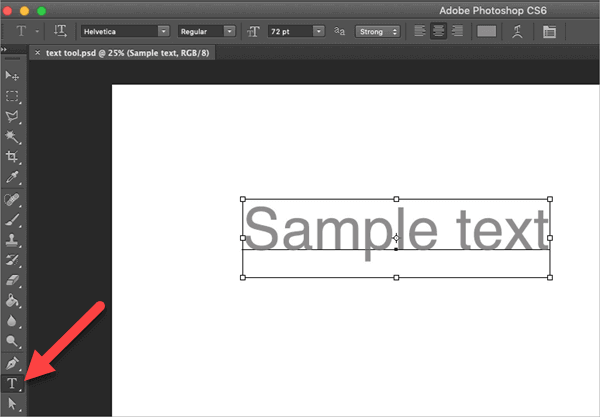
STEP 2: Set Font Style & Size
Once you are done with typing, go to Edit > Select All, which will highlight the text. While all of the text is selected, go to the top toolbar and choose the best font style for the text. Also, go to the color box available in the top toolbar and choose the color that you want to allot to your text.
(Note: If you don’t like the font styles available in Photoshop, you can find the font of your choice from the website like dafont.com, fontspace.com or any other free font download sites, and then use them in Photoshop.)
STEP 3: Rasterize The Text
Go to the Layers panel displayed on the left-hand side or you can also access it by going to Window > Layers. Once the Layers panel appears, right-click on the Text layer to find the option “Rasterize Type”. Once you find this option, click on it. This command will make your font style and size permanent and you will not be able to change it later.
STEP 4: Add Texture
Now it’s time to add some texture to your logo text. Go to the toolbar provided on the left-hand side and select the Magic Wand tool and use it to select the whole area covered by your logo text. You can use the “Shift” key from your keyboard in order to be able to select multiple areas together in succession.
Once the required area is selected, you can easily apply any kind of texture or image to it. First, open the image file or texture you want to apply to your logo. Once the file is opened, go to Select > All; then go to Edit > Copy; further go to File > Close and finally go to Edit > Paste Special > Paste Info. Thus the texture will be applied to your logo successfully.
STEP 5: Save Your Logo
Use the Move tool to position your logo in the right place. Once you are happy with the position, you can save this text logo as a custom brush so that you can use it as a logo stamp or watermark on any image in the future. But remember to add the color every time you use it because the custom brushes are saved in black and white in Photoshop.
And, if you don’t want to use it as a custom brush, you can also save it as a separate logo file in PNG format after removing the photo background. In this file, the logo will have a transparent background. In order to save it in a separate PNG file, first, you will have to click the padlock icon of the background layer to unlock it in order to be able to delete it. Once you have successfully unlocked it, delete it and save the file in PNG. Once saved, you can open your logo anytime to apply it to your photos as a watermark.
Part 2. How To Create Your Own Watermark Online For Free?
If you don’t have access to the graphic design software like Photoshop, still you can also create a watermark logo for your photos online. The best platform that I recommend everyone for performing this task is Canva.com. Canva is a website which not only provides the facility to create various kinds of beautiful graphics but also allows you to create a professional logo for your business or brand. In other words, you can use it as a watermark logo maker also.
Follow the four steps given below in order to design a watermark logo by using this best free logo maker:
Step 1: Create An Account
Create an account on Canva. It provides both the free and paid memberships to its users. You can go with the free one in the beginning and upgrade later if required. Once you have created an account on Canva, log into your account.
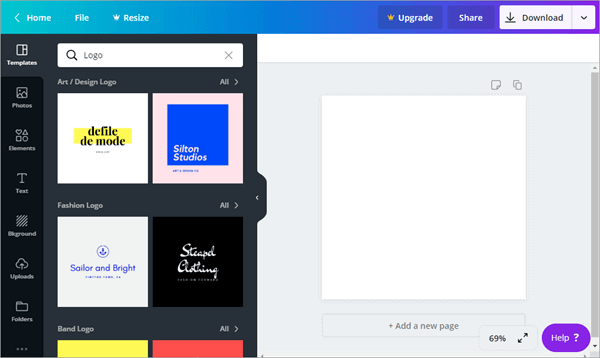
Step 2: Choose Logo Template
Once you’ve created your account you’ll see that Canva offers templates for every occasion. Then you should select Logo from the templates. You can also customize your favorable dimension by clicking on the box in the upper right corner.
![]()
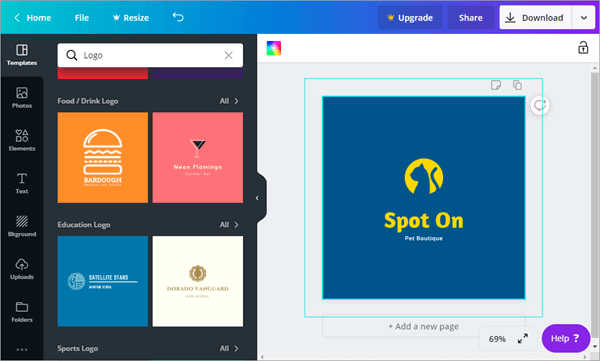
Step 3: Start Designing Logo
After that, you’ll be directed to the work area where you will see a variety of layouts, elements and options. Now it’s time to start designing your logo in Canva. It will be better if you first draw your design on a piece of paper so as to make it easy to perform the task in Canva. You can design a purely Font logo, a symbolic logo or a combination logo (a combination of text and symbol both).
Next, upload your photos that you want to include to your watermark logo. Canva provides a large variety of symbols, stock images, and fonts to choose from in order to help you create your own watermark online which will reflect the nature of your business.
Now, try and play around with different layouts and elements to make the kind of watermark you want for your photographs. Afterwards, add your own texts including your name or brand name to the watermark. If you want to make a desired logo for your brand, then it is recommended to standardize the font and colors for your company so that you can use the same font and colors in your logo as well. This kind of standardized approach helps in branding which further establishes the identity of your company in the eyes of your customer in the long run.
Step 4: Download and Share Your Logo
Once you have created a logo, don’t forget to download it so that you can make use of it wherever required. Canva allows you to download the file in both JPEG and PNG formats, or share it on social media. We will highly recommend you download it in PNG format which will provide you the logo with a transparent background. You can easily put the logo with a transparent background on any picture without leaving the effect of its own background (because it is transparent).
If you find that there is any element you don’t want to appear in the logo after downloading, you can use this Image Eraser software to remove unwanted items from the watermark photo. It allows you to save the photo in its original format, so that the software won’t spoil the transparent background of the watermark.


Final Words
Hiring a graphic designer for designing a watermark logo might be quite expensive for you if you have a tight budget because it’s very hard to find an affordable designer. So it’s far better to invest your time in learning and developing the skill than to invest your money in getting the things done by the skilled ones. You need not be as skilled as the professional graphic or logo designers are. But you should, at least, prepare yourself at the basic level so as to create your own decent watermark logo for your business.