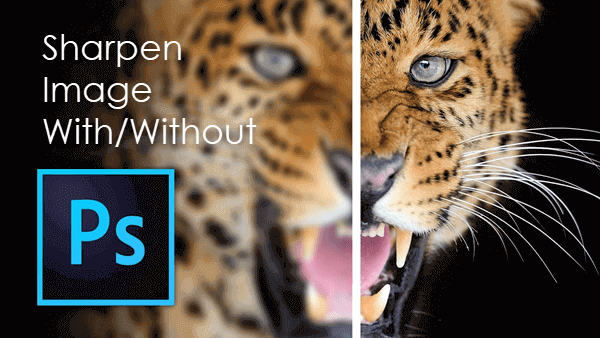
How To Sharpen An Image With Photoshop or Photo Sharpener Online
There are times when the photos that you have captured are not that much sharp, and you demand sharpening effects with the use of editing software. Hence in order to furnish you with the knowledge on how to sharpen an image, in this article we will explain both how to sharpen an image in Photoshop as well as how to make use of an online photo sharpener for photo sharpening with ease.
Before you go to sharpen your photo, we recommend that you erase unwanted objects from the photo if there are any. This will help you get a perfect and clear image after sharpening. You should know that undesired tourists, watermarks, censored parts on the photos and wrinkles, beard on your portraits will make your photos not look as good.


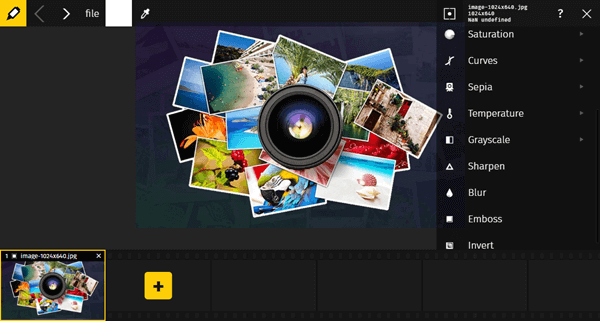
Part 1. How to Sharpen an Image in Photoshop with 3 Methods
When it comes to sharpening an image in Photoshop, there are mainly three filters that can be said to be the best ones for giving the sharpening effect to your photos. These filters are Smart Sharpen, Unsharp Mask, and High Pass. You can use any of these three filters for sharpening your image. But you can only add one filter on one photo. If you want to try more than one filter, try on different layers or different images. All of these three methods to sharpen an image with this best photo sharpening software are explained below step-by-step.
Method 1: Sharpen Photo with Smart Sharpen Filter
Sharpening with the use of the Smart Sharpen filter in Photoshop is possible by following the steps mentioned below:
Step 1. Open Photo and Create Duplicate Layer
First, launch Photoshop and open the photograph that you intend to sharpen. Click on the background layer with the right button of your mouse. Then choose the “Duplicate Layer” and click “OK” when a new windows pops up. After that, it will.
Step 2. Set Blend Mode
Now you will need to set the newly created layer’s blend mode as “Luminosity”. By doing so, you will be able to avoid any kind of color fringe near the edges.
Step 3. Open the Smart Sharpen Window
Now, zoom in to 100%. Go to “Filter” > “Sharpen” > “Smart Sharpen”. It will end up opening the window of “Smart Sharpen”.
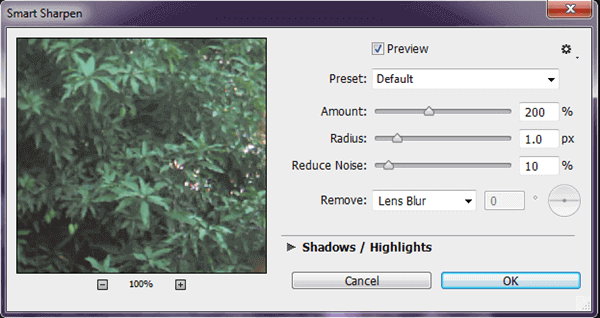
Once the window of Smart Sharpen is opened in front of you, select the option for preview in order to activate the preview. Thus you will be able to observe the sharpening effects in preview also along with the working area.
Step 4. Set Slider Values
In the window of Smart Sharpen, there are three sliders: Amount, Radius and Radius Noise. Set the value for “Amount” as 150-160 percent; the value for “Radius” as 1 or 2; and the value for “Radius Noise” as 10%. You can use the slider of “Shadows/Highlights” for removing the dark or light halos.
Step 5. Set Sharpening Algorithm
In the window of Smart Sharpen, Apart from the sliders, there is a drop-down menu of “Remove” that you can use to set the algorithm that you want Photoshop to use for sharpening your photograph. In the drop-down menu, there are three options for you to choose: Gaussian Blur, Lens Blur, and Motion Blur.
Motion Blur is used to remove the blur produced due to the subject movement or camera. And, on the other hand, you can make use of the Lens Blur if you want to reduce halos or want to apply a finer sharpening.
Moreover, there is an option for setting angle also provided just on the right side of the drop-down menu of “Remove”. Set the angle using this option. If you are happy with the sharpening effects produced by all the settings made by you, just hit the “OK” button to finish the process of sharpening image!
Method 2: Sharpen Image with Unsharp Mask Filter
As far as the process to sharpen a photograph with the use of Unsharp Mask filter in Photoshop is concerned, it includes the steps as given below:
Step 1. Create Duplicate Layer
First, launch Photoshop and then import the photo that you are going to sharpen. Right click on the background layer, and choose the “Duplicate Layer” to create a new layer which appears on the top of the background layer.
Step 2. Set Blend Mode
Now you will have to set the newly created layer’s blend mode as “Luminosity”, which will help avoid any kind of color fringe near the edges.
Step 3. Open the Unsharp Mask Window
Now you will have to proceed for applying a sharpening effect in the newly created layer. For this, first, zoom in 100%. Go to the “Filter”. Select “Sharpen” and then “Unsharp Mask”. It will open the window of the Unsharp Mask. In this window, select the option for Preview. Thus you will be able to observe the sharpening effects both in the working area and the preview as well.
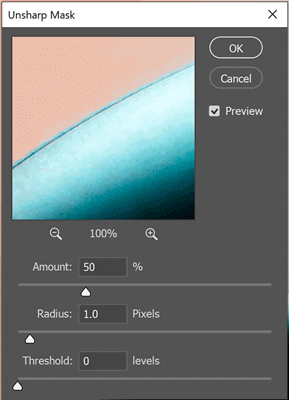
Step 4. Set the Values For Sliders
There are three sliders under the preview area in the window of Unsharp Mask: Amount Slider, Radius Slider, and Threshold Slider. Amount Slider indicates the sharpening amount. Radius Slider is for setting the number of pixels near the edges. And, on the other hand, the Threshold Slider helps in preventing the effects like color changes, etc.
Generally, the recommended value for the Amount Slider is 60-70; for Radius slider, the recommended value is 1-2; and for Threshold slider, it will be good to stay at the 0 value. But the most suitable value for all of these parameters actually depends on the type of camera you have used to capture the photo, the print size, and the sensor size also.
If you are happy with the sharpening effect produced by the values set for the sliders, just hit the “OK” button. And, it’s done.
Method 3: Sharpen with High Pass Filter
In order to sharpen a picture with the use of the High Pass filter in Photoshop, you will need to follow the steps mentioned below:
Step 1. Open Photo in Photoshop
First, launch Photoshop on your computer and open the photograph that you want to sharpen.
Step 2. Make Your Image Layer a Smart Object
Click on the menu icon provided at the top right corner of the Layers panel, then it will display a menu of options. Select the “Convert to Smart Object” from the options available on the menu. By selecting this option, you will end up converting your image layer from the Background layer into a Smart Object.
Step 3. Select High Pass Filter
Now go to the menu bar, select “Filter” > “Others” > “High Pass”. Once you select the “High Pass” option, the color of your image will be transformed into gray and there will also appear a dialogue box for the “High Pass” filter.
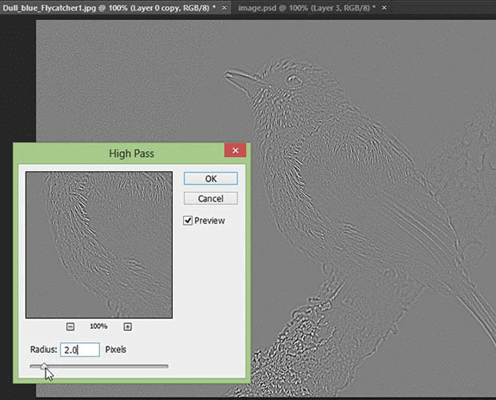
Step 4. Enter the Value for Radius Slider
In the dialogue box for the High Pass filter, a slider for radius value is provided at the bottom part of the dialogue box. You can adjust the value by simply dragging the slider or filling the exact value for the required radius. Keep the value for the radius as low as possible. That’s because the lower the radius value, the higher the contrast along the edges will be. And, for sharpening, we need higher contrast along the edges only. You can start dragging the slider in order to figure out the radius value that works best for your photo. Generally, in most cases, a radius value of 3-5 works best. Once you are done with filling the best value for the radius, hit the “OK” button to close the dialogue box of the “High Pass” filter.
Step 5. Set the Blend Mode for Filter
Once you have applied the High Pass filter, it will be listed in the layers panel also. And, it can be identified as Smart Filters in the panel. Now you will need to double-click on the icon of Blending Options provided on the right side of the name of the filter in the layers panel. Once you double-click on it, a new dialogue box of Blending Options will appear in front of you. In the dialogue box of Blending Options, select the required option from the drop-down menu of “Mode”. Various options to choose from are Overlay, Hard Light, Soft Light, and Linear Light. “Soft Light” and “Overlay” are the commonly selected options for sharpening the photographs with the use of the High Pass filter.
Step 6. Set the Value for Opacity of Filter
In the dialogue box of Blending Options for the filter, just below the drop-down menu for blend mode, there is also an option for filling the value of the opacity of the filter. The value of opacity can be used to fine-tune the sharpening effect on your picture. Enter the most suitable value. Remember that the higher the value for opacity, the higher the sharpening effect will be.
Once you are done with entering the best opacity value of the filter, just hit the “OK” button to close the dialogue box.
Part 2. How to Sharpen an Image with Photo Sharpener Online
Below we have also mentioned two of the best tools for sharpening images online for those who don’t have Photoshop. Just have a look at these two online photo sharpeners.
#1 Raw.pics.io Converter and Editor
When it comes to sharpening an image with the use of an online photo sharpener, the best one that we would like to recommend is Raw.pics.io converter and editor. This online tool is free to use and you can make use of this tool if you don’t want to use the advanced photo editing software like Photoshop for sharpening your photos. Now follow the steps given below for sharpening an image with this tool.
Step 1. Open the Online Tool
First, visit the webpage through your web browser. Click on the START button in order to open the Raw.pics.io converter and editor.
Step 2. Add Photo from Your Computer
Now the photo that you want to sharpen needs to be added. Click on the “Open Files From Computer” in order to add the required image. Then go to the left sidebar and select the “Edit” option.
Step 3. Apply Sharpening Effect
Once you select the “Edit” option, a toolbar will appear on the right side. Now you have to select the “Sharpen” tool from the various tools available in the toolbar. Once you click on the “Sharpen”, the sharpening effect will be applied to the photo. And, it’s done.
#2 Pine Tools Online Photo Sharpener
Another online tool that I would like to recommend is the photo sharpener offered by PineTools.com. To sharpen blurry images online with this free tool, all you need to do is just following the steps mentioned below:
Step 1. Open the Tool and Load Image
First, go to the PineTools Sharpen Image through your web browser. Then click on the “Choose File” button in order to be able to select the desired image file (that is needed to be sharpened) from your computer.
Step 2. Set the Sharpening Strength
Once you select and open the desired image, a preview of the image will be displayed below the “Choose File” button. On the right side of the image preview, enter a value for the “Strength” needed for the sharpening operation. You can also simply drag the slider in order to adjust its value.
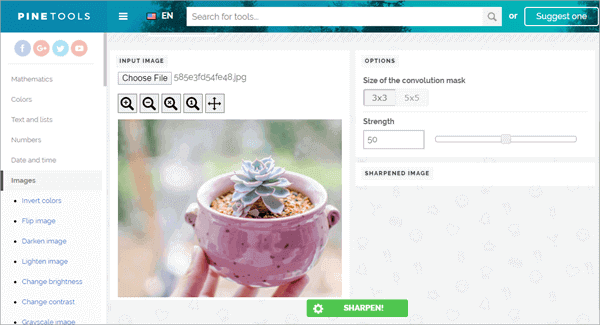
Step 3. Sharpen Image
Once you are done with setting the best value of sharpening strength, hit the “Sharpen” button provided at the bottom part of the interface. After that, the image will be sharpened according to the value of sharpening strength entered by you. A preview of the sharpened image will appear on the right side of the interface.
Step 4. Download Sharpened Image
If you are happy with the sharpening result, you can go ahead to download the file in PNG, JPG or WEBP format by just clicking on the button provided just above the preview of the sharpened image.
Bottom Line
You will need to sharpen an image whenever you want to enhance its focus or its texture needs to be emphasized. The methods mentioned above will help you to perform this task easily. If you also want to know how to reduce noise in photos so as to enhance the quality of your photographs, you can check this another tutorial. Or if you have some other better recommendations, please feel free to tell us in the comment section below.