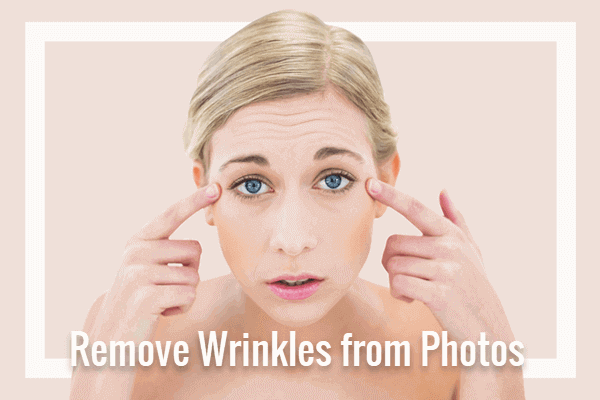
How to Remove Wrinkles From Photos With 5 Methods
Whenever you find that there are distracting wrinkles and crow’s-feet in your photos, it will be good to remove them. But the question is how you will be able to successfully remove wrinkles from photos. Below we have mentioned 5 effective methods to remove crow’s feet around your eyes, creases on your forehead, and wrinkles on your face in your portraits.
Method 1: Remove Wrinkles From Photos With Jihosoft Photo Eraser
Before we go to learn how to remove wrinkles from Photoshop, we would like to show your a much more simple and effective way to complete the task, that is, using a wrinkle remover photo editor named Jihosoft Photo Eraser. It is a very useful photo editing tool when it comes to removing wrinkles on your face and any undesired objects in pictures.


New And Improved Features
The key features that Jihosoft Photo Eraser comes with are as follows:
- Besides removing wrinkles, it can also easily remove skin blemishes from selfies and portrait photos.
- You can make use of this program for removing any undesired part or object from your images.
- It can also be used to repair old black and white photos by erasing scratches.
- There are also options for removing watermark, logo, date stamp and text from the photos.
- There is also the feature to clone any object in the picture.
- Filling the black area in the panorama photos is also possible with the use of this program.
Process To Remove Wrinkles From Photos
Below we are going to describe the steps that you will need to follow in order to be able to successfully erase wrinkles from photos with the use of Jihosoft Photo Eraser:
Step 1: Import the Image
The very first step is to launch the program on your PC or computer. Once it is launched, import or add the image to be edited in the program.
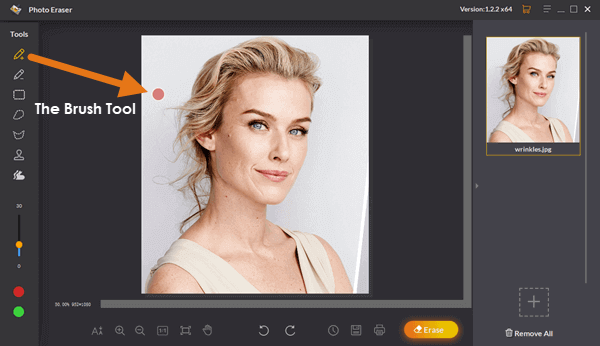
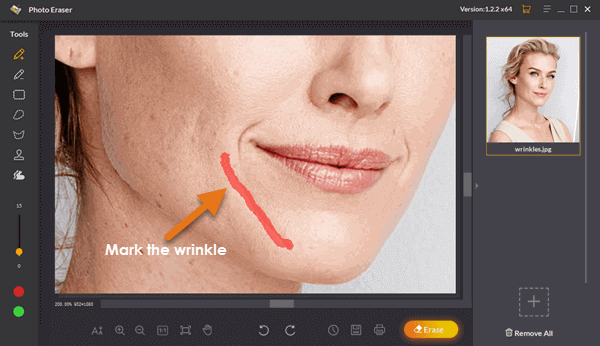
Step 2: Mark the Wrinkle Area
Now go to the toolbar provided on the left-hand side and select any selection tool. Make use of this selection tool to cover the area having the wrinkles to be removed from the pictures. As the picture shown above, one easy-to-use selection tool that you can make use of for selecting the desired area in your picture is the Selection Brush tool. There are several other selection tools like the Polygon Selection tool, Lasso Selection tool, etc. You choose any suitable tool for performing the selection task.
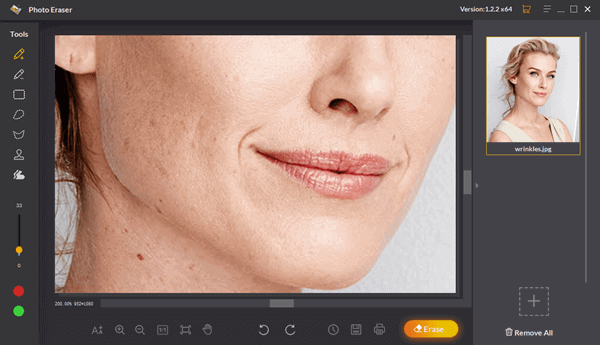
Step 3: Remove Wrinkles with One Click
Once the area having the wrinkles to be removed is successfully selected, you can go ahead for erasing wrinkles from the picture. All you need to do is just hit the “Erase” button at the bottom right corner. After that, the wrinkles in the selected area will be removed seamlessly. And, it is finally done.
Method 2: How To Remove Wrinkles In Photoshop
Featured with the Healing Brush tool, Photoshop can also work as a wrinkle remover software. For those who want to keep the natural sign of aging and improve the image slightly, to reduce wrinkles is much better than to completely remove wrinkles from the subject’s face in the photo. If you do think so too, this Photoshop tutorial is good for you.
When it comes to the process to remove wrinkles from photos with the use of Photoshop, the following are the steps that you will need to follow:
Step 1: Open the Photo and Create a New Layer
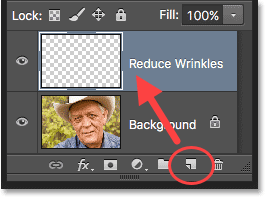
First, open the image to be edited in Photoshop. The opened image will be displayed as a background layer in the layers panel. Then add a new blank layer to the panel by pressing and holding the “Alt (Win)/Option (Mac)” key and click on the icon of “New Layer” provided at the bottom part of the Layers panel.
When a dialogue box for the New Layer open up, you can name the new layer as “Reduce Wrinkles” and then hit the “OK” button so as to close the dialogue box. Then the newly created layer will be displayed just above the already existing background layer. By default, it will be the active layer. So any change that you make will be applied to this new layer.
Step 2: Choose the Healing Brush
Go to the tools panel of Photoshop and click on the icon of the “Spot healing Brush Tool” with the right button of your mouse. Then select the “Healing Brush Tool” from the new menu.
Step 3: Set the Sample Option
Now go to the “Options Bar” displayed on the top part of the screen. There is an option for “Sample” with a drop-down menu. Click on the drop-down menu so as to select the “All Layers”. By default, the “Current Layer” is selected. And, on the left side of the “Sample”, there is an “Aligned” option. By default, this option is unchecked or unselected or un-activated. And make sure to keep it unchecked.

Step 4: Take Sample of a Good Texture Area
Zoom in on the picture’s part which you want to remove or reduce the wrinkles from. Once it is zoomed in, it is the time to first take the sample of an area of the good texture by pressing and holding the “Alt” key from your keyboard. At the same time, your cursor will be converted into a symbol of a target.
Now you will need to click on the good texture area to sample it by using this target symbol. It is recommended to take a sample from an area near the wrinkle area.
Step 5: Start Healing the Wrinkle Area
Now release the “Alt” key to let your cursor turn back to the regular brush cursor. After that, start painting over the wrinkles with the healing brush. You will need to move the healing brush over the wrinkle area while holding down the left button of your mouse.
Make sure that you are making use of the brush size slightly larger than the size of the wrinkle you are painting over. And, you can use the left bracket (“[”) to decrease the brush size; and right bracket (“]”) to increase the brush size. After painting over the wrinkle, just release your mouse button, and then the new texture will be blended with the brightness and color of the area you have painted over. Thus the wrinkle will be removed.
In the same way, go to another area in the picture where you have to remove the wrinkle from. And repeat the same process as mentioned above in order to remove other wrinkles in the picture.
NOTE: Removing the wrinkles completely from a picture will make it look unnaturally. So the best solution is to just make them lighter and less distracting instead of making them disappear completely. So you can go ahead with one more step mentioned below so as to make your picture look natural.
Step 6: Set Blend Mode and Opacity
Go to the option for Blend Mode provided in the upper left corner of the Layers panel. From there, you should set the blend mode to “Lighten”.
On the right side of the Blend Mode option, there is an option for setting the Opacity of the layer. By default, the value for the opacity is set to 100%. You should lower the value between 50% and 60%, which should work best.
Thus after setting the Blend Mode to “Lighten” and lowering the Opacity, the wrinkles will appear again. But this time, they are not as dark and distracting as they were. And, it’s done.
Method 3: Remove Wrinkles From Photos In Paintshop Pro
PaintShop Pro is also a professional photo editing software only available for Windows computer, but it is far more accessible than Photoshop. It is available for all skill levels and its users can do everything they need, including erasing wrinkles from images.
You will need to follow the steps mentioned below to remove wrinkles from images by using PaintShop Pro:
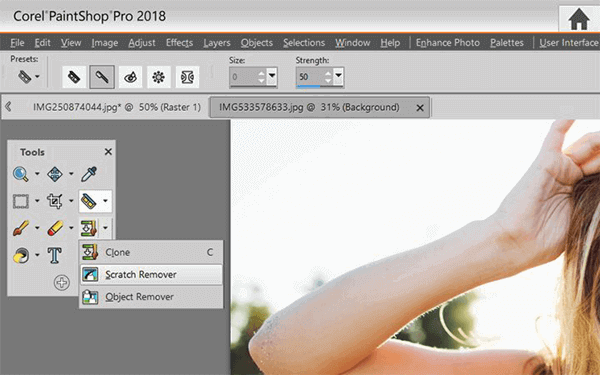
Step 1: Launch the Program and Select Scratch Remover
Install this software on your computer and then launch it. After that, go to the toolbar provided on the left-hand side and select the “Scratch Remover” tool from there.
Step 2: Choose a Selection Box
There are available two types of Selection boxes on the tool options palette: Beveled Edge and Square Edge. Select any one of them.
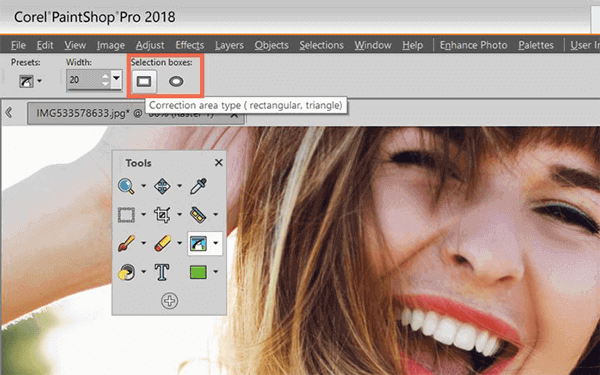
Step 3: Set The Value For Width
On the left side of the Selection boxes, there is an option for setting the value for “Width”. Then just set a value for width so that the selection box may suitably cover the wrinkle to be removed.
Step 4: Erase Wrinkles
Finally, start removing the wrinkles from your picture. All you need to do is just drag the pointer over the wrinkles in the picture. Drag in such a way that the inner area of the selection box may enclose the wrinkle whether it is rectangular or beveled selection box. The area from where you will remove the wrinkles will be filled with the texture surrounding that particular area. You can anytime undo the changes if you are not happy with the change and want to try another value of the “Width”. Thus once you are done with removing the wrinkles from your photo, you can save your photo.
Method 4: Free Apps to Remove Wrinkles from Photos
As far as the free app to remove wrinkles from photos is concerned, you can make use of these free apps to remove wrinkles from photos on your mobile phone:
Visage Lab
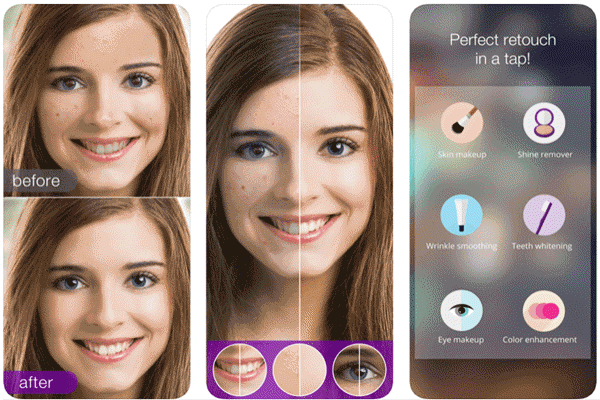
Visage Lab is a face retouching app available for both iPhone and Android. You can use this application for smoothing wrinkles, whitening teeth, color-enhancing, adding makeup to photos, and many other photo retouching operations. The retouching is done automatically in the picture. It simply means that you will not have any control over how much alteration will be applied. After retouching the picture, you can save it or share it directly on social media sites like Facebook, Twitter, Instagram, etc.
PicBeautys
PicBeauty is a facial photo editing application that you can make use of to retouch your photo in case it has wrinkles, blemishes, etc on Android and iPhone devices. Apart from removing the wrinkles and blemishes from photos with its “Smooth” option, you can also make use of its “Whiten” option to whiten teeth in your photo. Moreover, this wrinkle remover photo editor app is free to use.
Facetune
Another app that we would like to introduce here in this list of free apps to remove wrinkles from photos is this Facetune. Not only the wrinkles but also the acne, stray hair, etc can be removed from your portraits. This is a handy application that will be useful also in changing the color of the eyes and fixing red eyes in photos. There are many other uses of this application that will make it a cheaper alternative to Photoshop Express in many cases.
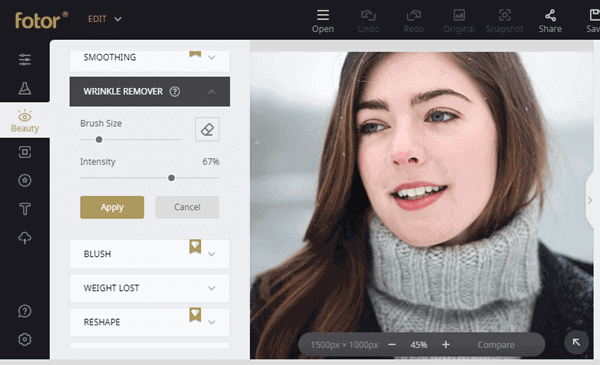
Method 5: Online Wrinkle Remover Tool
You can also make use of an online wrinkle remover for your portrait photos. Fotor’s Wrinkle Remover should be one of the most popular online tools that you can use for performing this task. However, given that it is a free tool, there are some advertisements appearing in the operation interface which might bring negative impact on the user experience.
There are only three simple steps involved in the wrinkle erasing process:
- Step 1. First, open this free wrinkle remover photo editor online and import a photo to be edited.
- Step 2. Set proper values for the Brush Size and Intensity. Then brush over the wrinkles in the photo.
- Step 3. Once you have modified the image to the desired extent, just save it in the required quality and format. And, that’s it.
Bottom Line
You can use any of the solutions mentioned above in order to slightly reduce or completely remove wrinkles from photos. But rather than completely removing the wrinkles from photos, we would like to recommend you to just reduce them to some extent. That’s because completely removing them may cause your photos to look unnatural. In case there are the pictures that are to be used in magazines, you might think of completely removing wrinkles from the pictures. In such cases, that may be OK. But when it comes to real-life photos, you will not want a 50 years old person to look like a teenager.